Manufacture & Distributor Webportal
HOW TO REGISTER ON COLS 365 WEB PORTAL:
Step 1: Go to Chrome /Safari/Opera/Firefox web browser then type https://cols365.com

Step 2: Click Log In Icon.

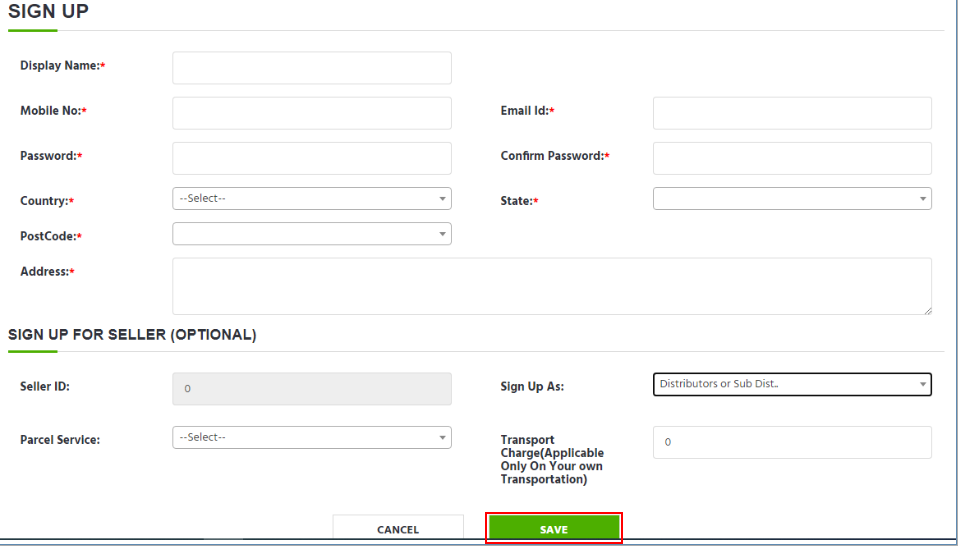
Step 3: Click New User? Create New Account as manufacturer or distributor.

Step 4: Fill-up all details needed and make sure you select sign up as a manufacturer or distributor.

HOW TO LOG-IN ON COLS 365 WEB PORTAL:
Step 1: Click Log In Icon.
Step 2: Type your Email ID and Password.

Step 3: Click log in button.

Once you log in as Manufacturer/Distributor, you can view this HOME page. [Manufacturer Shop Now button and Distributor Shop Now button and POS Sell Button]. At the top of manufacturer and distributor button, can see the icon for HOME, SHOP, MY ACCOUNT and SELL.

HOW TO PLACED ORDER ON MANUFACTURER SHOPS:
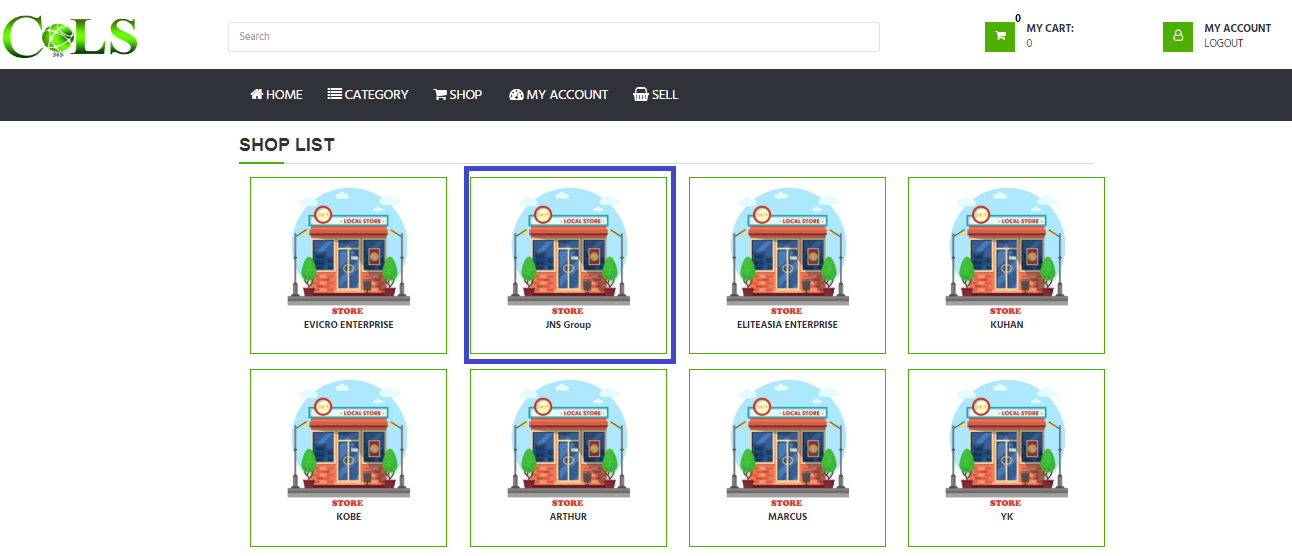
Step 1: Click the Manufacturer Shop Now button to view all manufacturer shops.

Step 2: Select the manufacturer shop to view all the available products on their shop.
Step 3: Select the item you want to order and change the quantity if you need to order more.

Step 4: Just click add to cart button.

Note: if you want to go back on home page just click HOME and if you want to go back on SHOP LIST page just click BACK TO SHOPS.
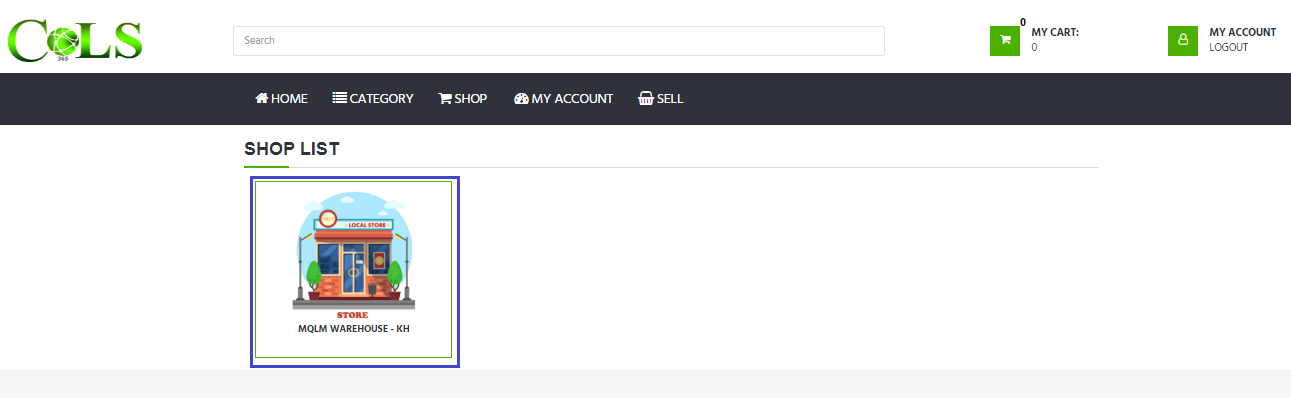
HOW TO PLACED ORDER ON DISTRIBUTOR SHOPS:
Step 1: Click Distributor Shop Now button is to view all distributor shops.

Step 2: Select the distributor shop to view all the available products on their shop.
Step 3: Select the item you want to order and change the quantity if you need to order more.

Step 4: Just click add to cart button.

Note: if you want to go back on home page just click HOME and if you want to go back on SHOP LIST page just click BACK TO SHOPS.
HOW TO PAY YOUR ORDER USING IPAY88:
Step 1: Go to MY CART.

Step 2: Review your order. Check if need to add the item quantity just type the number on the box.
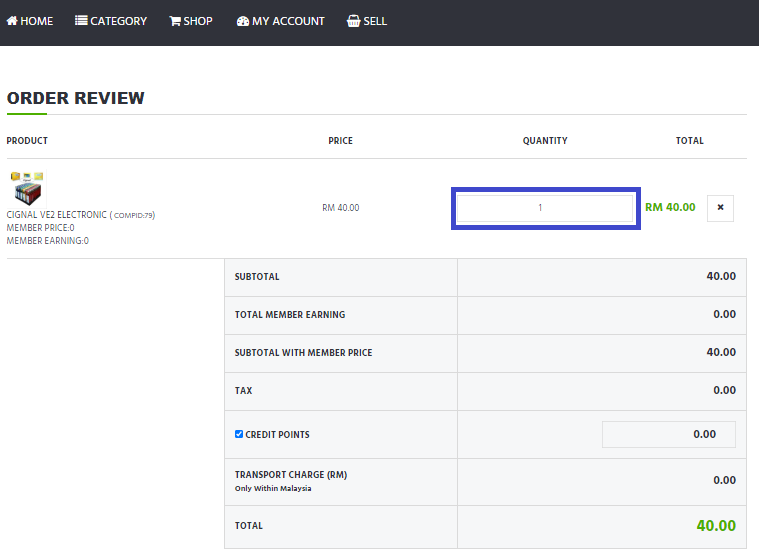
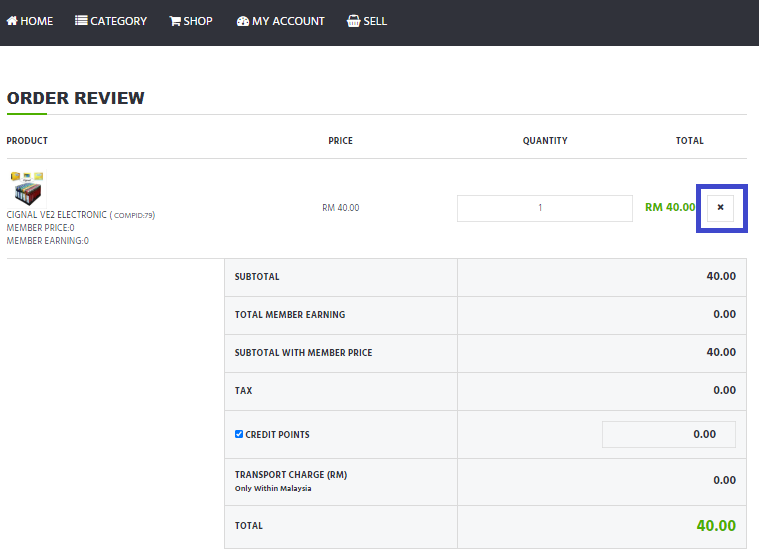
Note: In case you want to cancel your order, just click X button.
Step 3: Click Proceed for payment button.
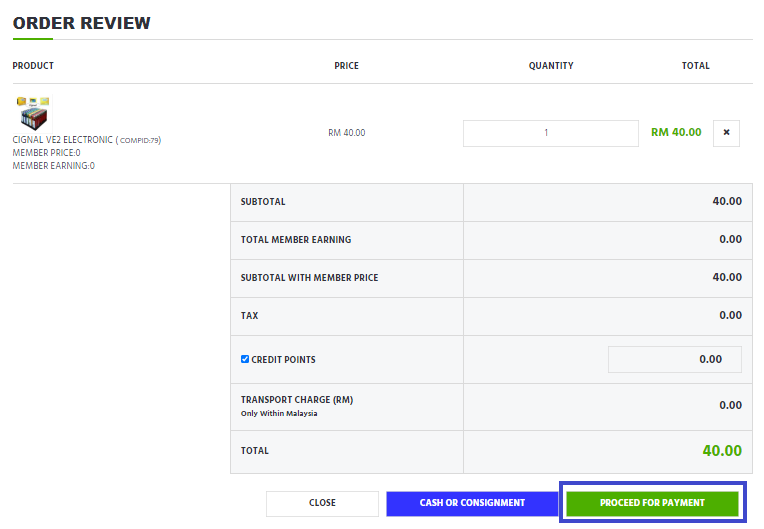
Step 4: Click Proceed with payment button
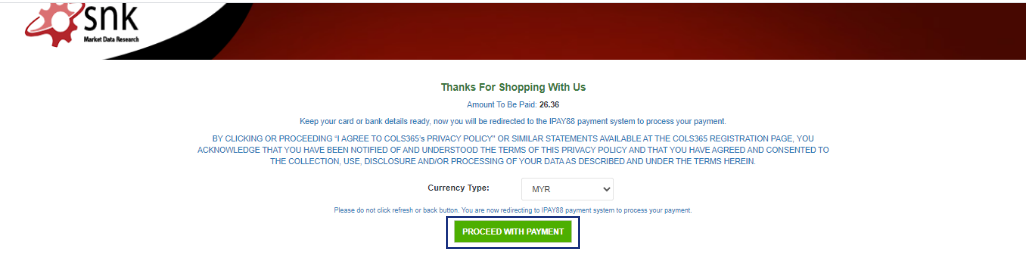
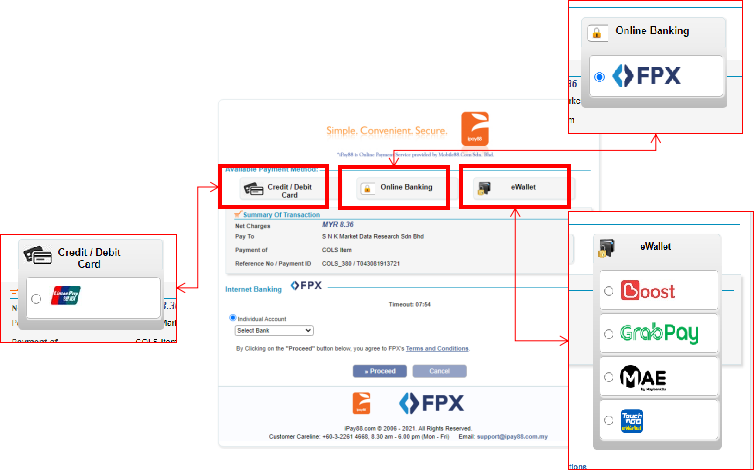
Step 5: Select payment method do you prefer [Credit/Debit Card, Online Banking, e-Wallet]
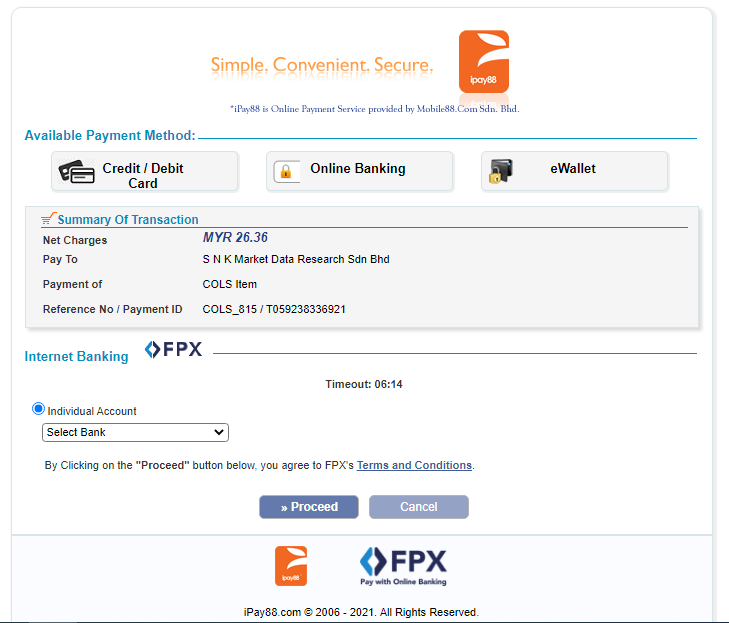
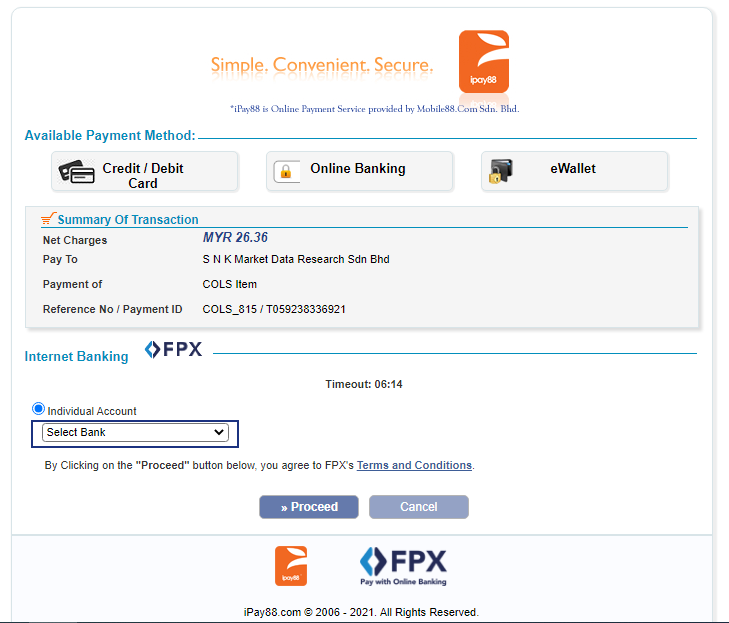
Note: Internet Online Banking thru FPX must select the bank first.
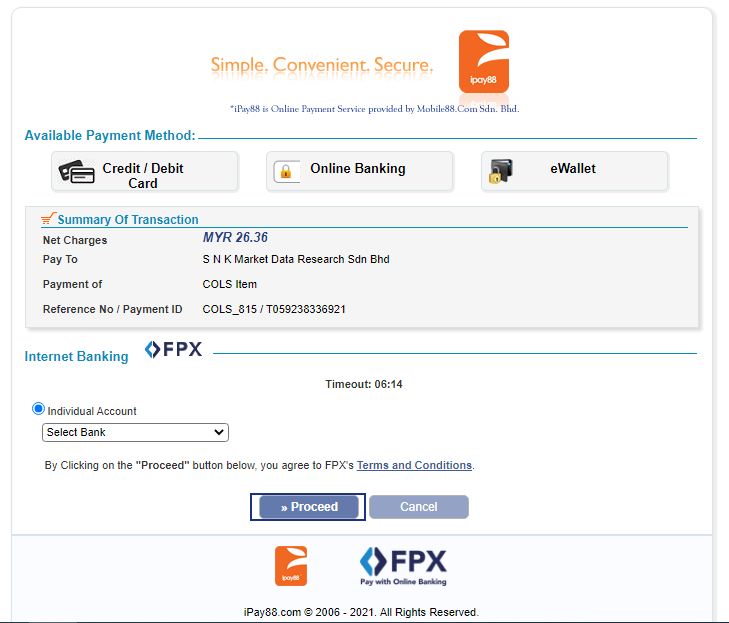
Step 6: Click Proceed Button to do payment
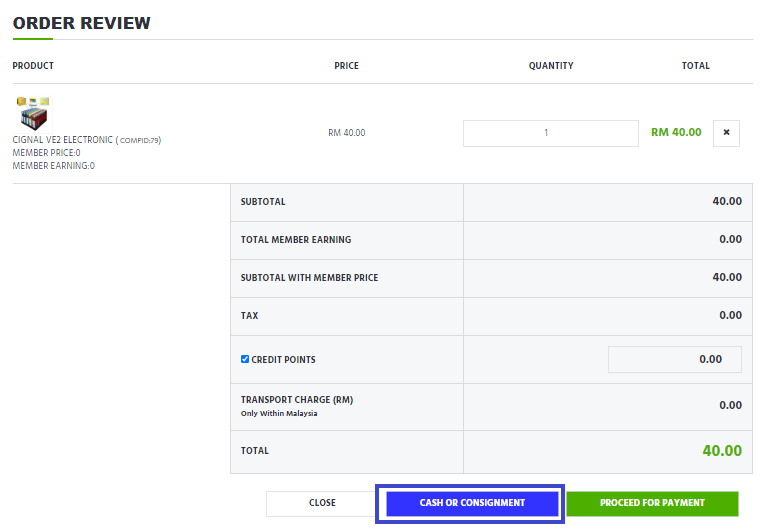
HOW TO PAY YOUR ORDER USING CASH OR CONSIGNMENT:
Step 1: Go to MY CART.
Step 2: Review your order. Check if need to add the item quantity just type the number on the box.
Note: In case you want to cancel your order, just click X button.
Step 3: Click CASH OR CONSIGNMENT button if you want to pay later.
HOW TO VIEW THE MANUFACTURER/DISTRIBUTOR PRODUCT BY CATEGORY:
Step 1: Choose either you want to visit the manufacturer or distributor shop and click shop now button.
Step 2: Click Category icon.
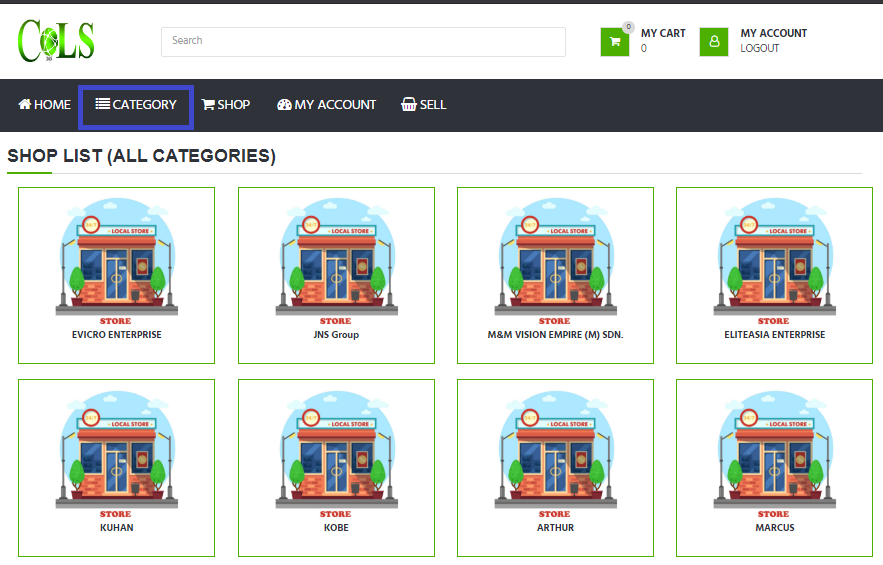
Step 3: Select a category want to visit.
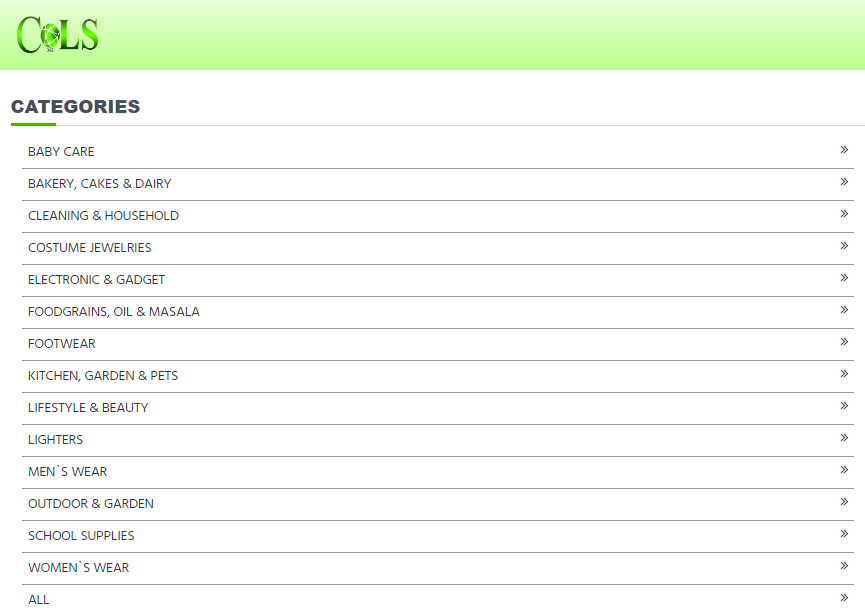
Step 4: Select a sub-category you want to visit.
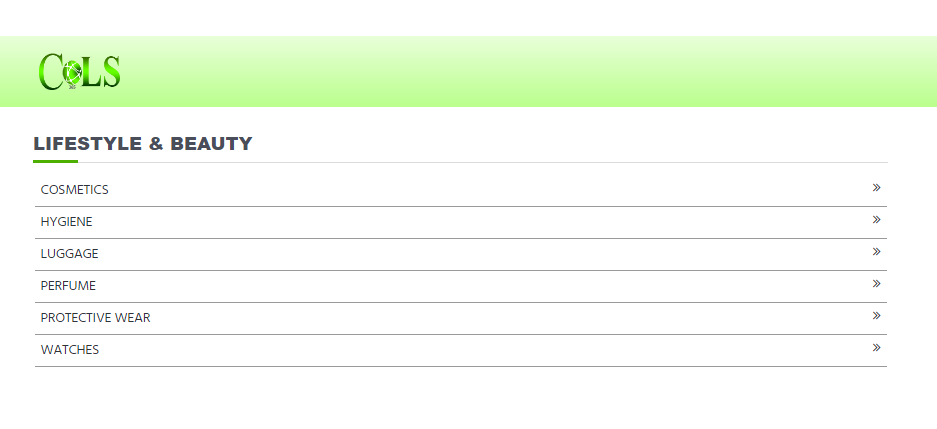
Then If you select watches category all the products on this sub-category will show.

NOTE: BACK TO SHOPS button is to go back on the shop list under the specific category and Incase you want to go back on HOME page just click HOME button
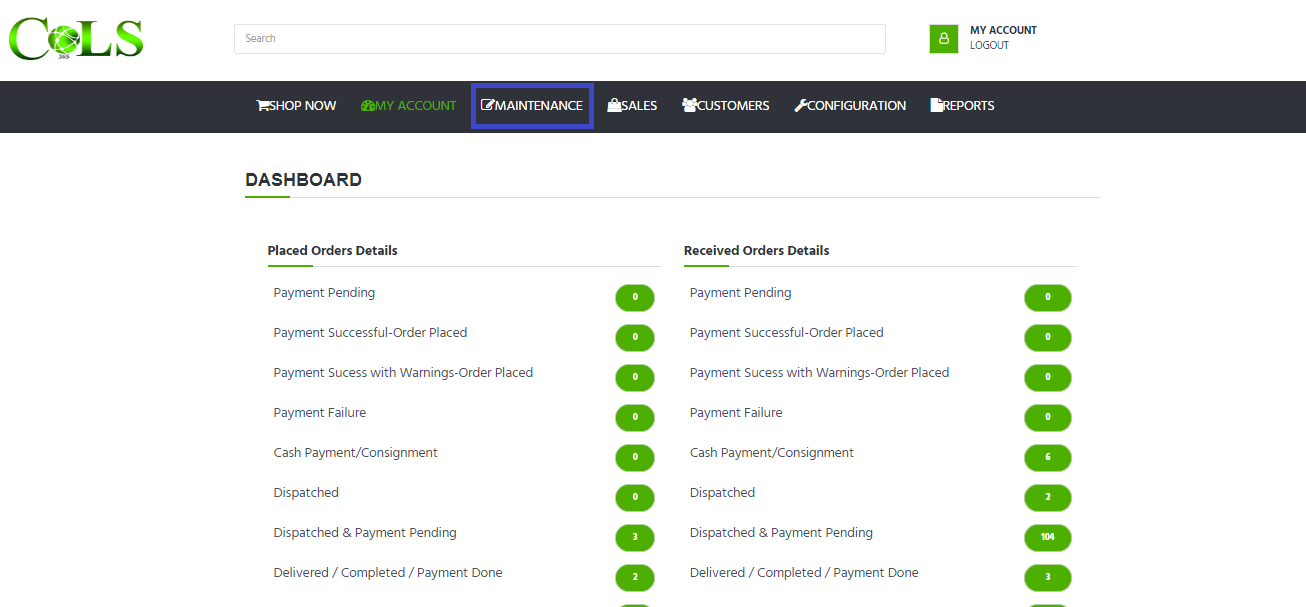
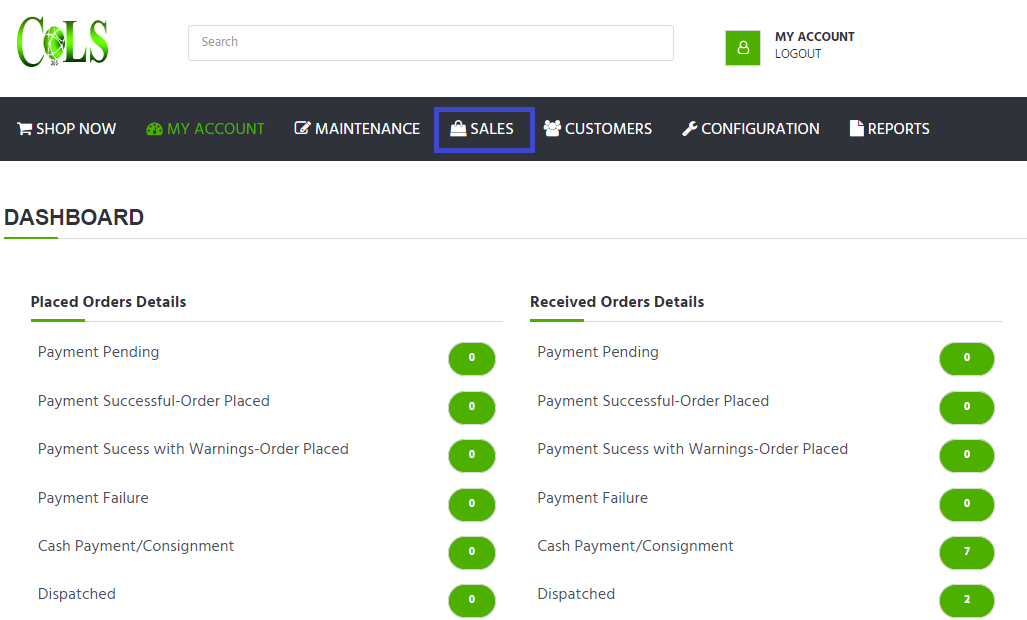
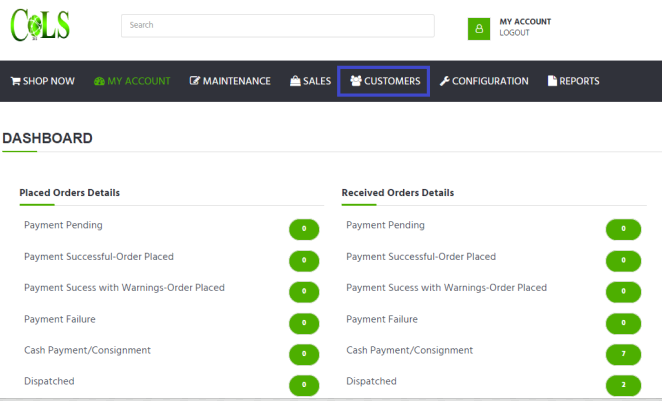
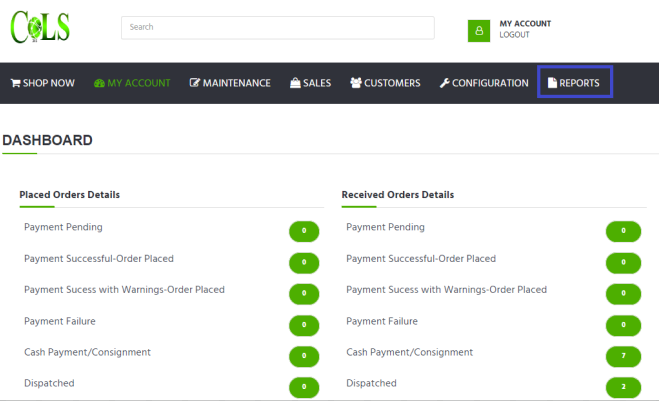
HOW TO VIEW DASHBOARD PAGE:
Click MY ACCOUNT on HOME PAGE.

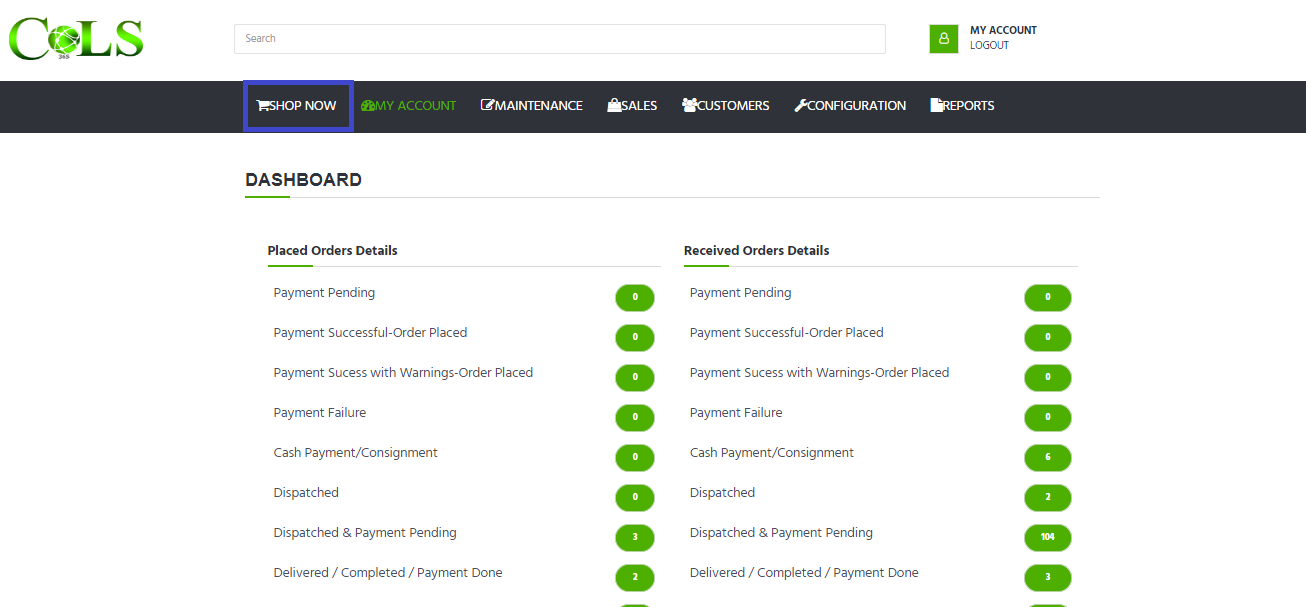
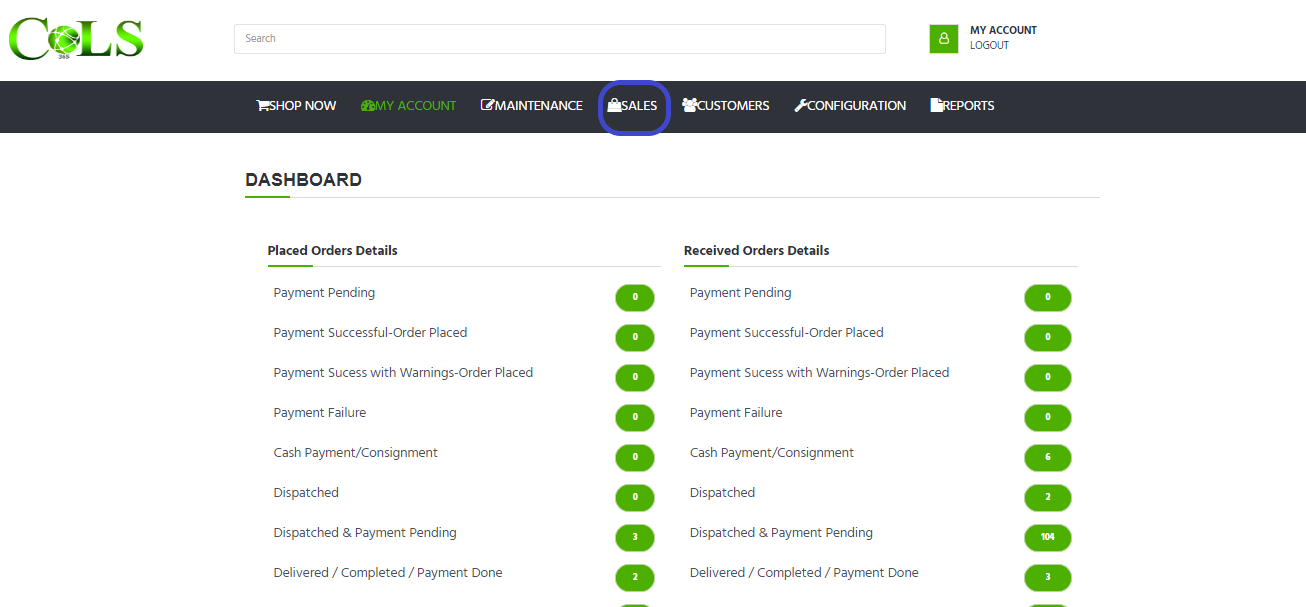
MY ACCOUNT shows Dashboard Page [Account Details, Place and Received Order Details]. On this page, you can view the summary details of placed and received orders. On the top of dashboard page can access the shop now, my account, maintenance, sales, customer, configuration and reports of your own online shop.
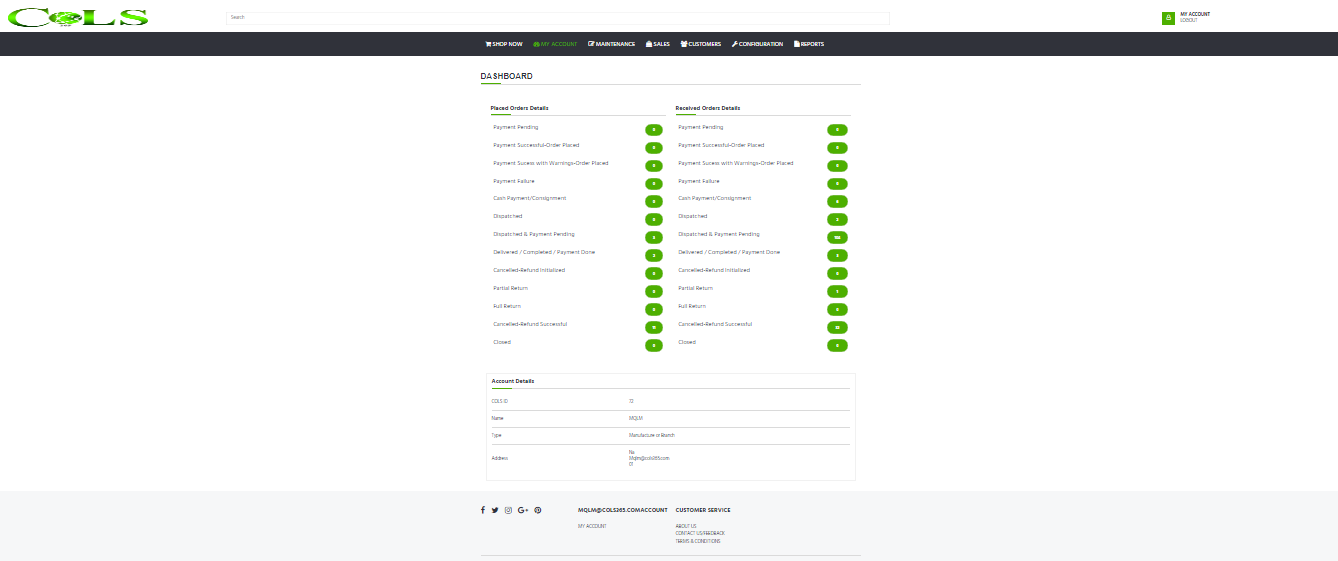
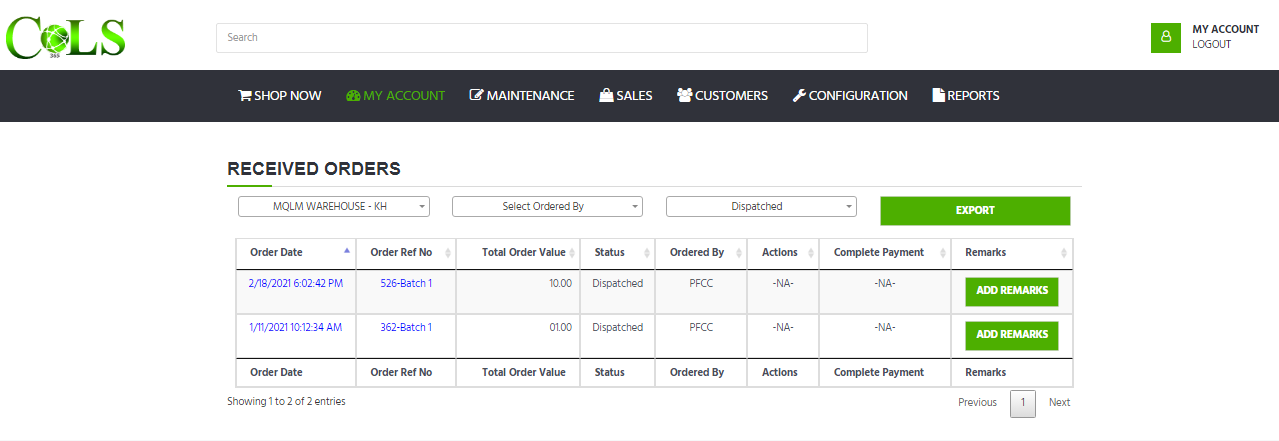
To view the summary details of placed or received orders by order status, just click the green button on right side of respective placed or received orders details you want to view.
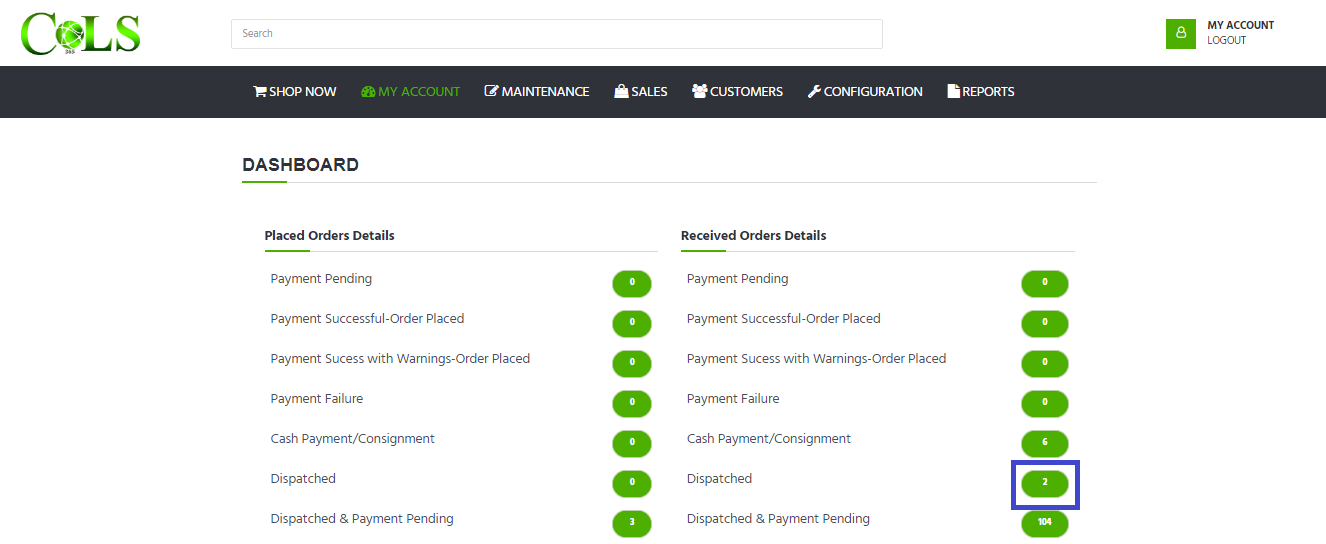
Sample List of All Dispatched Orders:
FUNCTION OF SHOP NOW BUTTON:
SHOP NOW will shows all the manufacturer/distributors products.

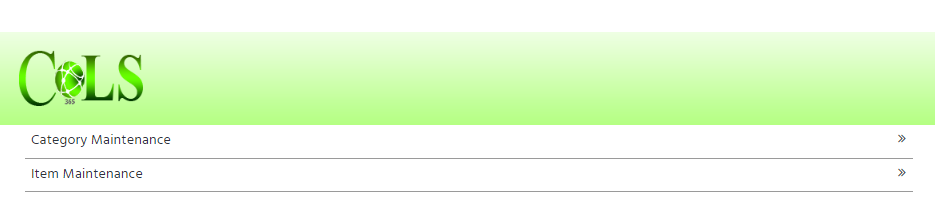
FUNCTION OF MAINTENANCE BUTTON:
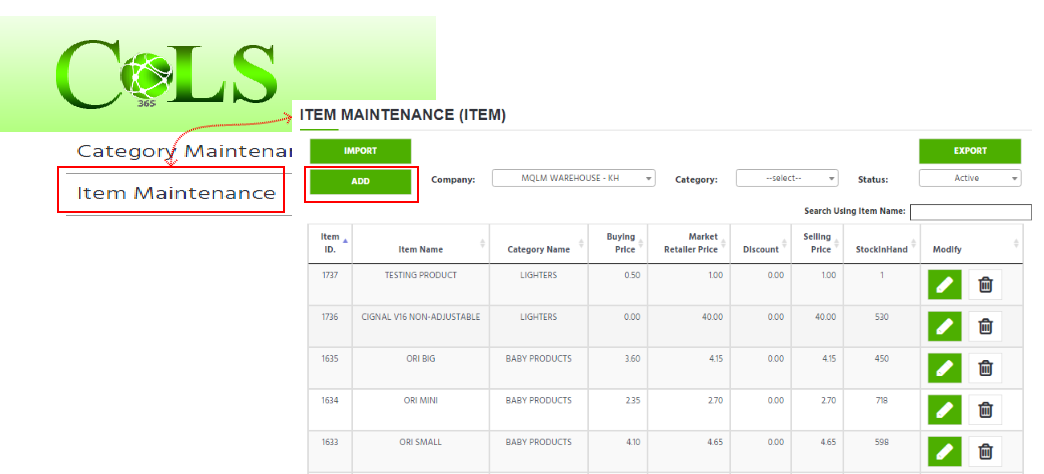
MAINTENANCE shows Category Maintenance and Item Maintenance
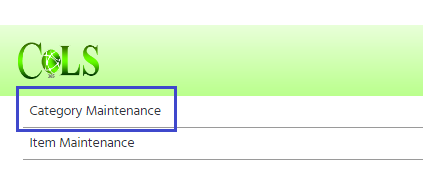
HOW TO ADD ITEM CATEGORY:
Step 1: Click category maintenance.
Step 2: Click ADD button.

Step 3: Select main category on drop down.
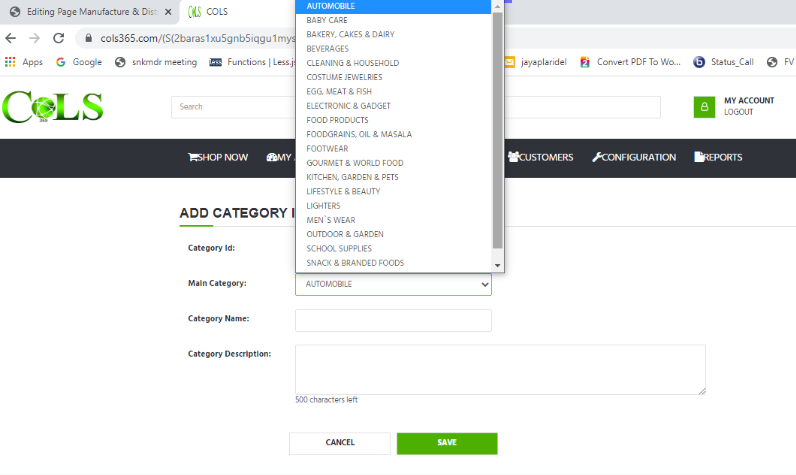
Step 4: Fill up the form and click SAVE button.
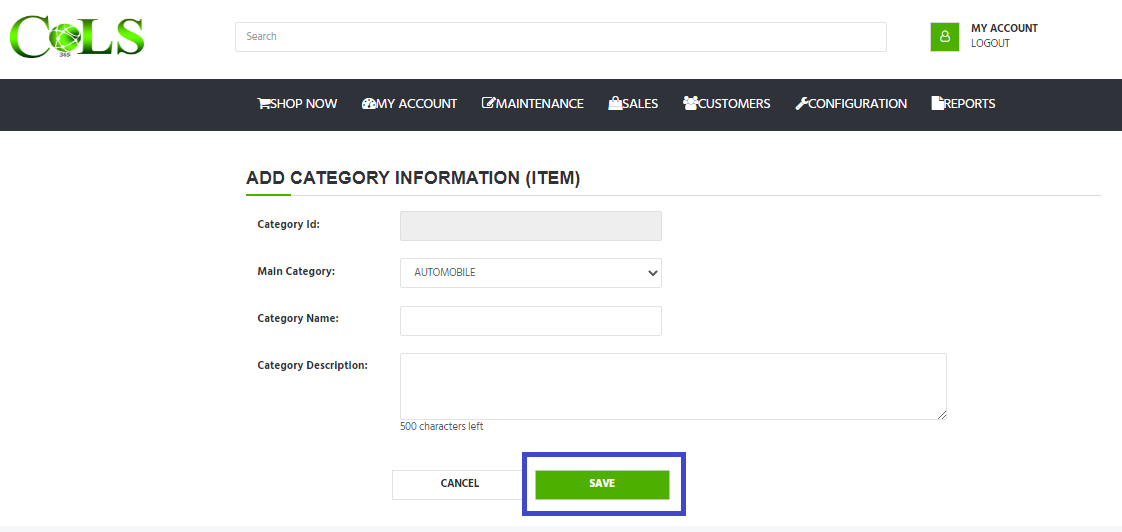
Note: Once product category is newly add, you can modify [edit or delete] within the day you created it. For editing/deleting old category must contact COLS365 customer service to change it.
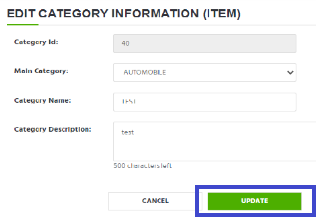
HOW TO EDIT ITEM CATEGORY:
Step 1: Click the pen icon.

Step 2: Edit the category information that you want to change. Then Click update button.
On CATEGORY MAINTENANCE, you can delete your product category information by clicking the dust bin icon. Deleted category name, means it will be inactive only so that in the future if you need it again you can enable it back. To see an inactive category name must select only on status.

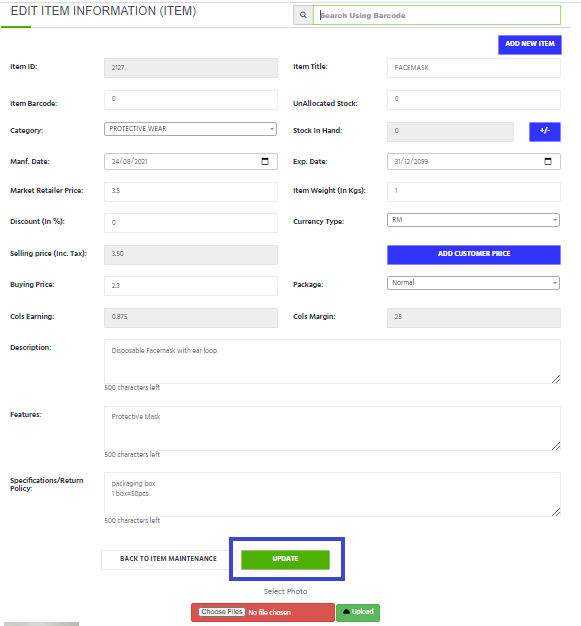
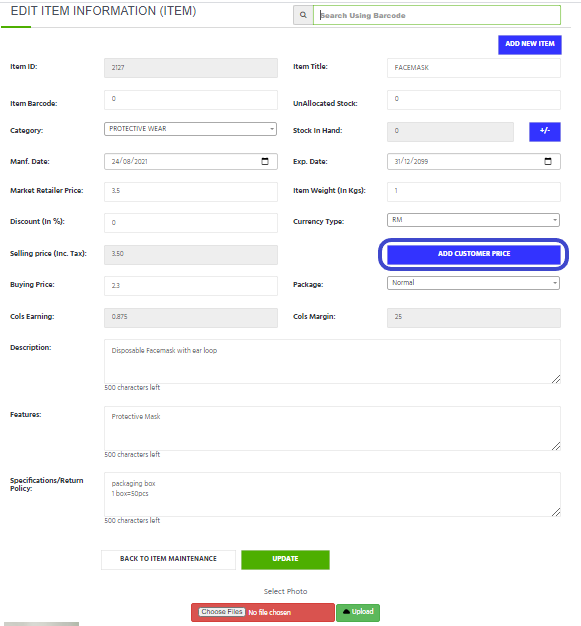
HOW TO MANAGE YOUR PRODUCT:
On ITEM MAINTENANCE, you can add your product information one by one.
Step 1: Click the ADD button
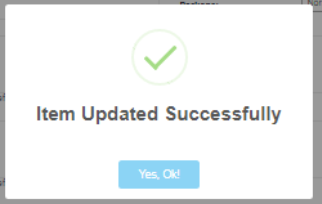
Step 2: Fill up this form and once done, must click first the update button and pop-up message appear “Item Updated successfully”.
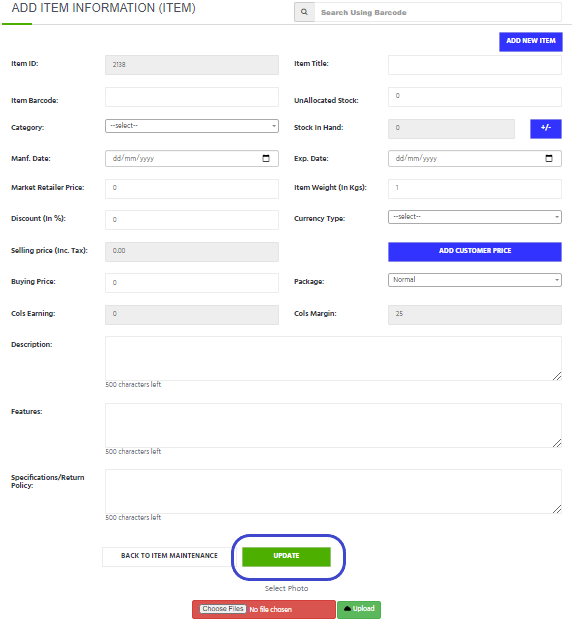
Step 3: Click choose file button to choose the item photo. Select the photo and click open button.

Step 4: Click upload button and pop-up message appear “your image uploaded successfully”.
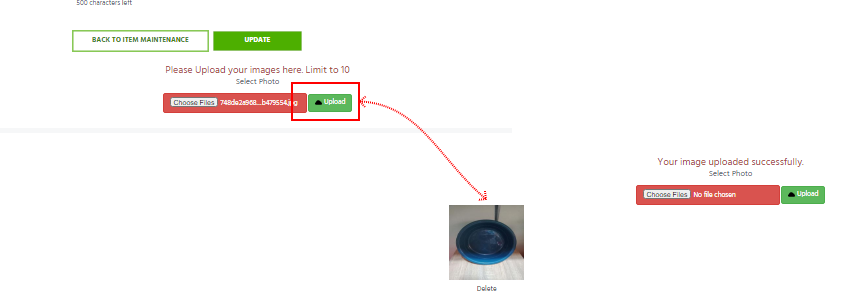
Note: In case you want to change photo just click delete button. Then a pop-up message appear “your image eleted successfully”.

HOW TO EDIT YOUR PRODUCT INFORMATION:
Step 1: Click the pen icon.
 Step 2: Change the details and click update button.
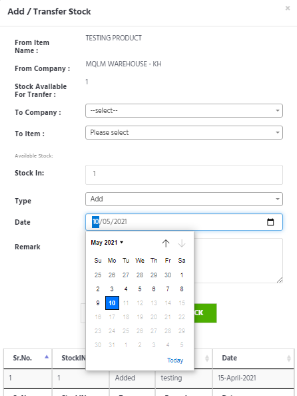
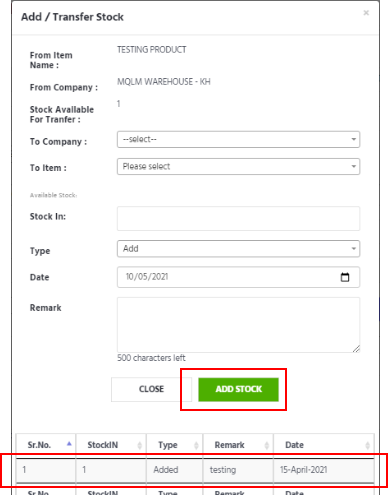
HOW TO ADD/REMOVE/TRANSFER STOCKS:
Step 1: On the edit item maintenance page, click the +/- button.
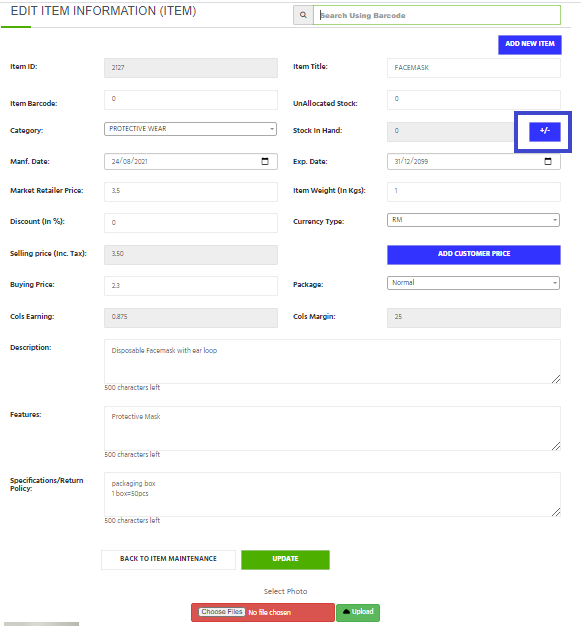
Step 2: Select company if need to transfer to another company branch Then Select what item need to transfer the quatity. If adding or removing stocks to your own stocks no need to select it.

Step 3: Put the stock quantity you want to add or remove on Stock-In, then select add/remove on Type Bar.
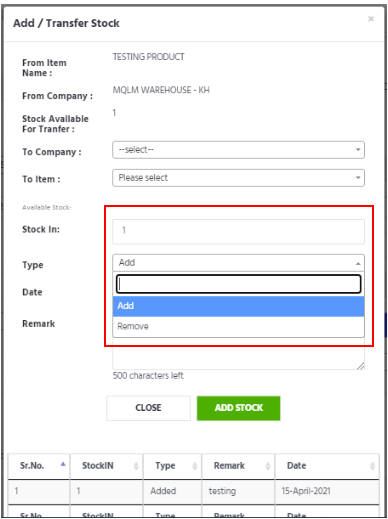
Step 5: Put date when you add/remove/transfer the stocks and put remarks why you add/remove/transfer the stocks.
Step 6: Click Add Stocks Button then below of the screen it will show the details of stocks you added/removed/transfered.
On ITEM MAINTENANCE, you can delete your product information. Note: Deleted item name, means it will be inactive only so that in the future if you need it again you can enable it back. To see an inactive item name must select only on status.

HOW TO ADD COMPANY BRANCH/DISTRIBUTOR/SELLER/CUSTOMER PRICE:
Step 1: On the edit item maintenance page, click the add customer price button.
Step 2: Select type on dropdown if manufacture or branch/distributor/seller/customers.
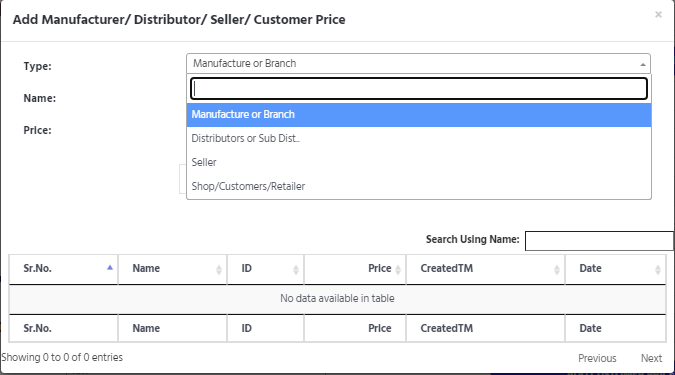
Step 3: Select the names of manufacture or branch/distributor/Seller/Customers on the dropdown.
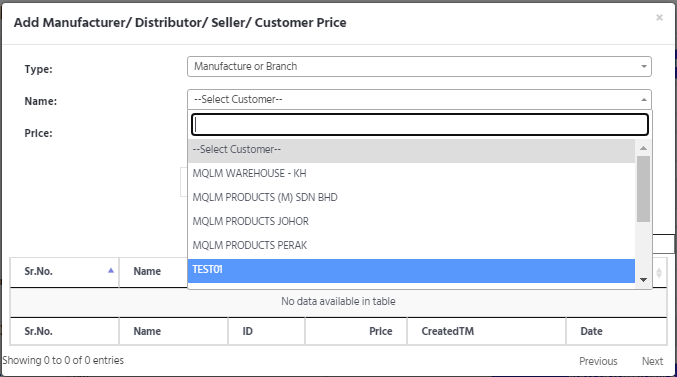
Step 4: Type the allocated price for manufacture or branch/distributor/Seller/Customers. Then click add price button and it will be added on the list below.
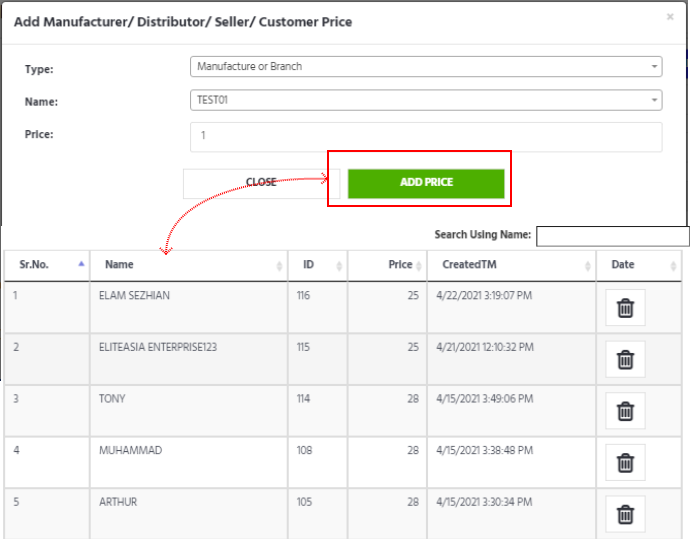
Note: In case have changes on price just click the dashbin button on right side and you can add price again.
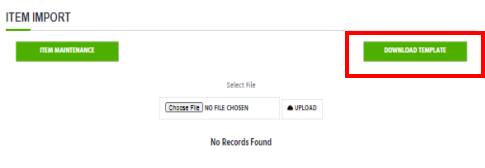
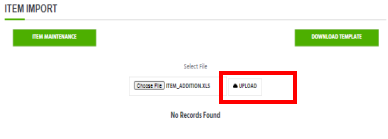
On ITEM MAINTENANCE, you can add your all product information by using the import button.
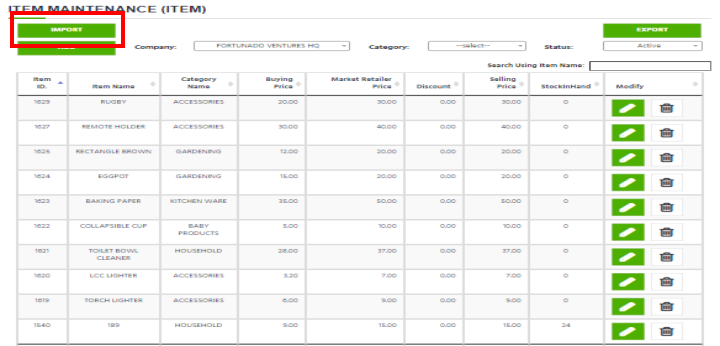
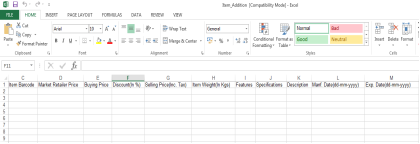
Step 1: Must download the Template [.xls file].
Step 2: Open the file and fill up the necessary information of your product. Once done save it.
Step 3: Click choose file button.
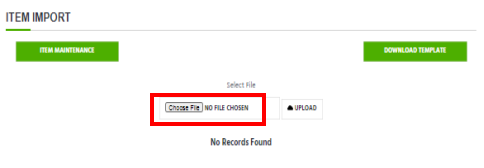
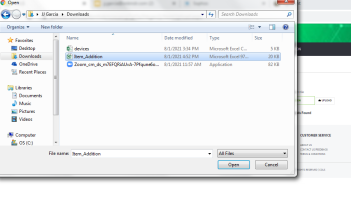
Step 4: Select the file that you save. Click open button.
Step 5: Click Upload.
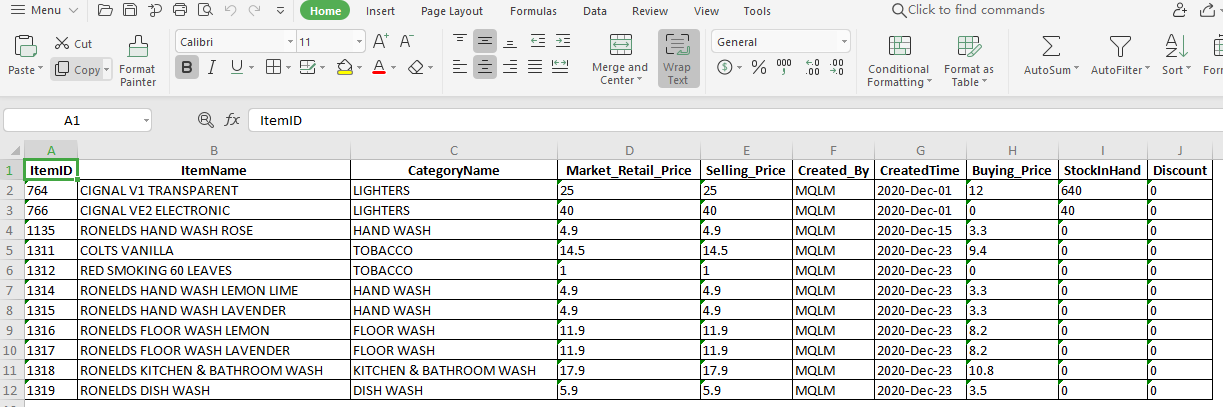
On ITEM MAINTENANCE, you can download your item list by clicking the export button. Open the excel file and you can view all the item on the list.

FUNCTION OF SALES BUTTON:
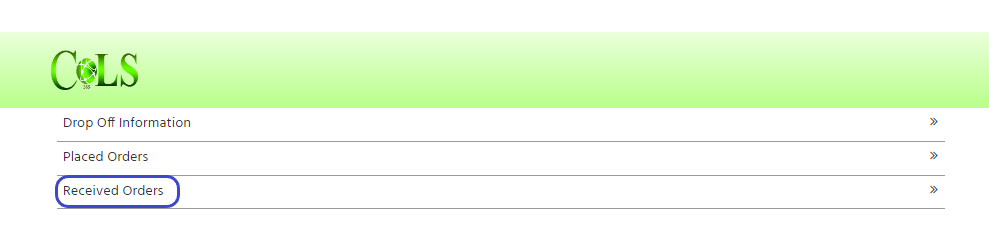
SALES can view the Drop Off Information, Placed Orders and Received Orders.
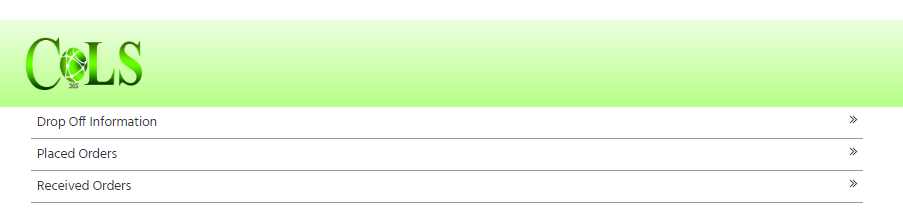
DROP OFF INFORMATION can view all the locations and details of couriers on which you can drop off your product that for delivery to customer.

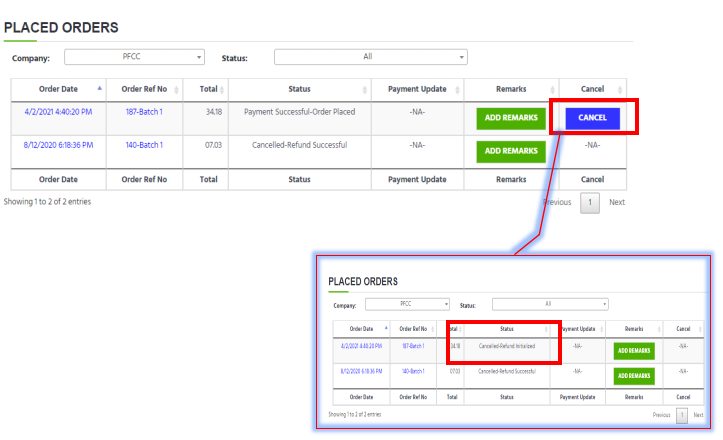
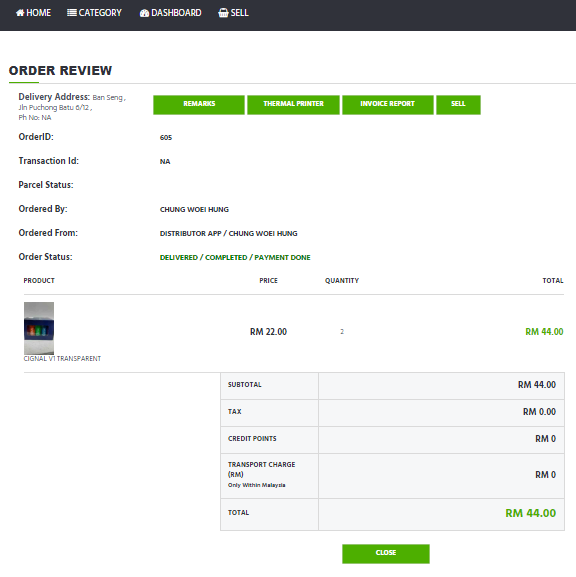
PLACED ORDERS can view all your purchased items and you can review also what item you purchased.
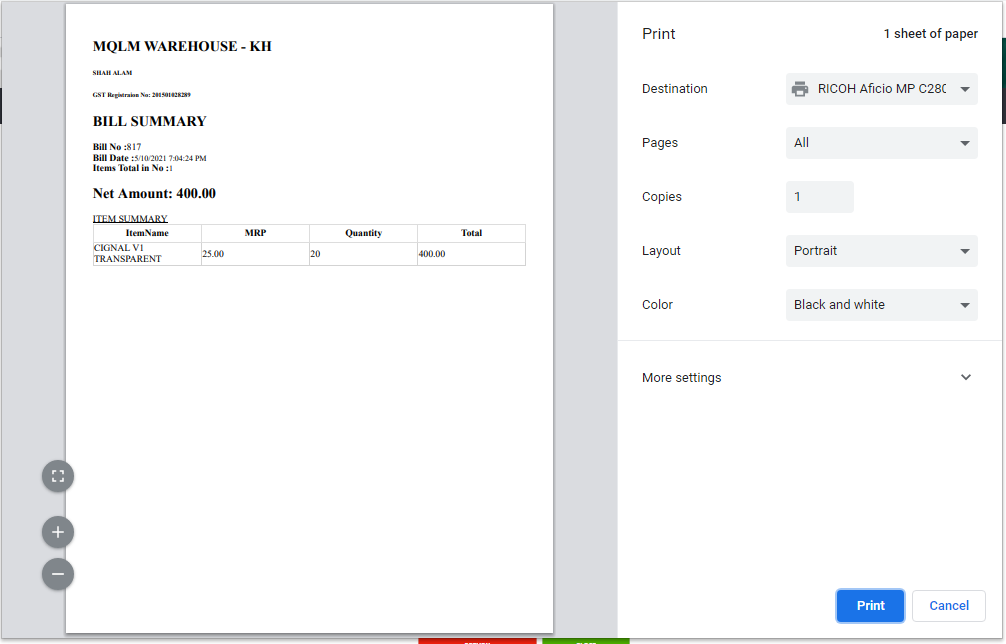
If you need to print just click thermal printer button.
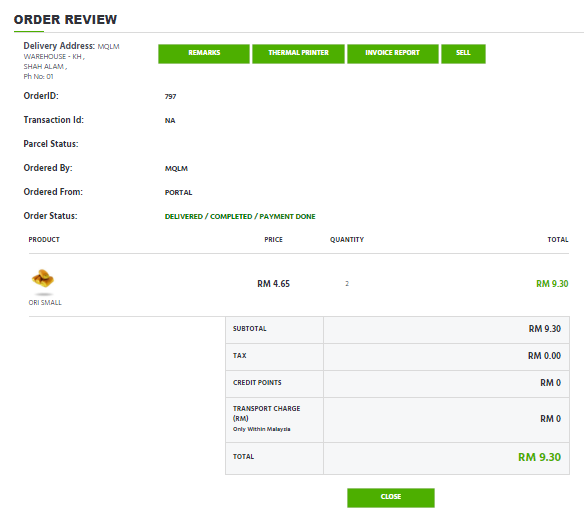
If you need the place order report just click the export button.
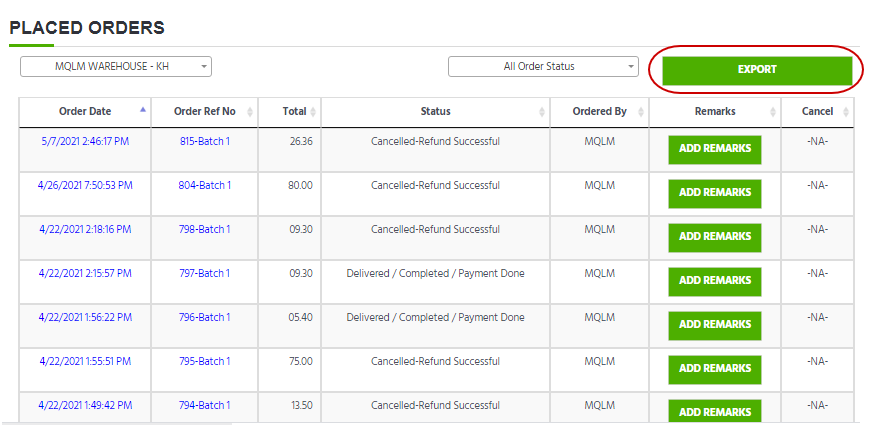
SAMPLE PLACE ORDER REPORT

And if you want to cancel after payment just click cancel button. The status will be change to cancel-refund initiated.
Adding remarks on your purchased item:
Step 1: Just click add remarks button.
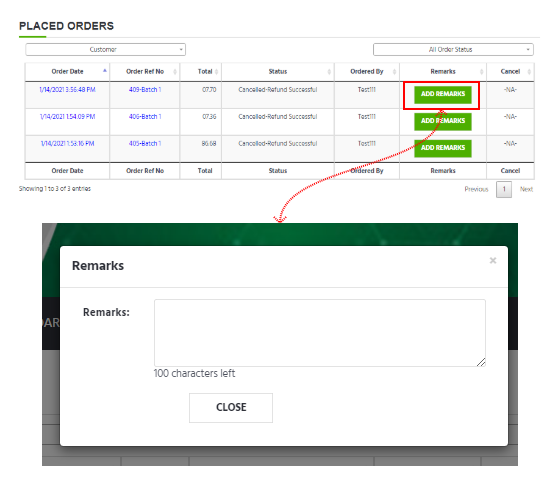
Step 2: Type your remarks and click save button. Pop-up message will appear "Remarks added successfully"
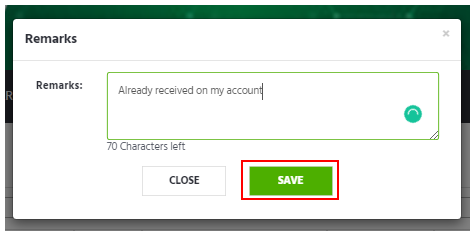

Note: Once you add remarks on the item it will send email notification on the manufacturer/distributor shops.

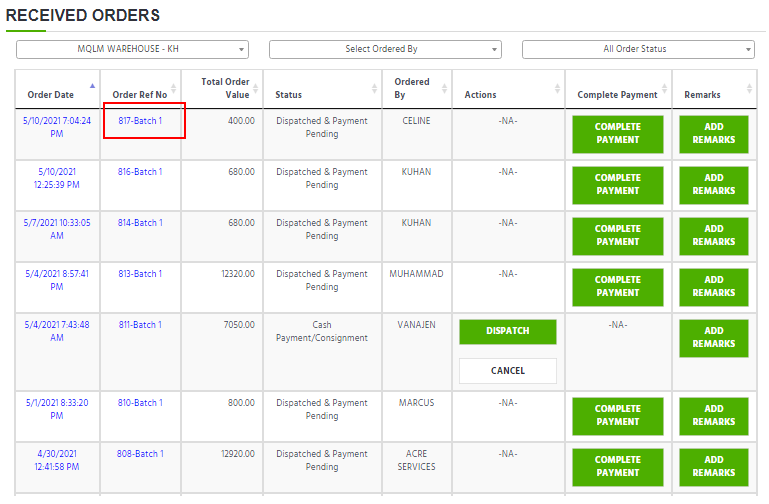
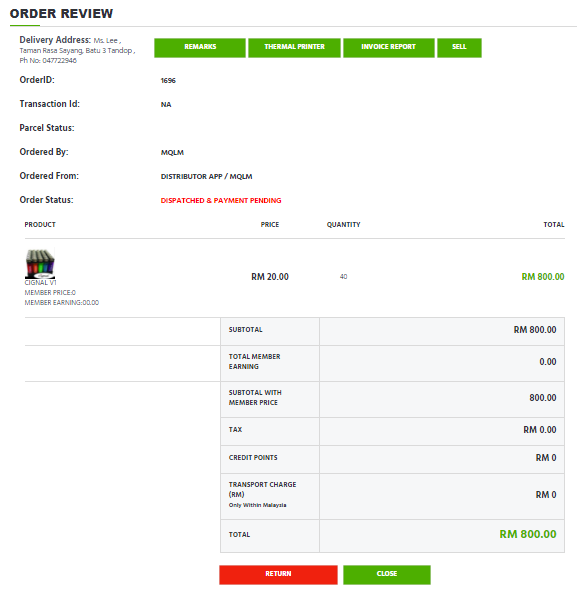
RECEIVED ORDERS can view all your customer's orders and you can monitor also the below items:
1. All paid/unpaid items or cash payment/consignment status
2. All dispatched items
3. All pending for dispatch.
4. Can review the order received
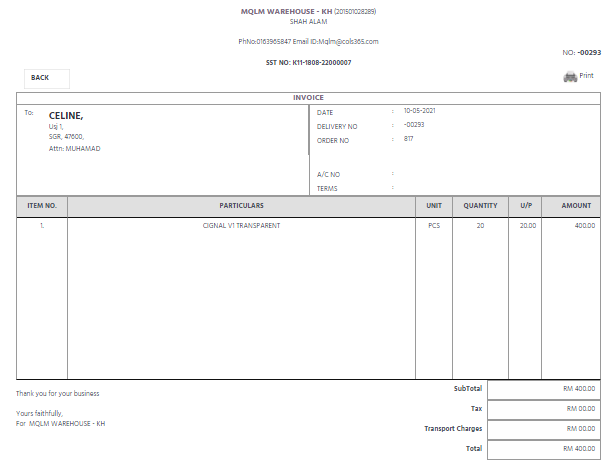
5. Can view the bill and invoice.
6. Can print the bill and invoice
7. Can monitor here if customer cancel the order after the payment
8. Can update the return quantity of the customer.
9. Can update the partial payment of the customer and can monitor the balance until it fully paid.
10. Can export the received order report


Sample Received Order Report

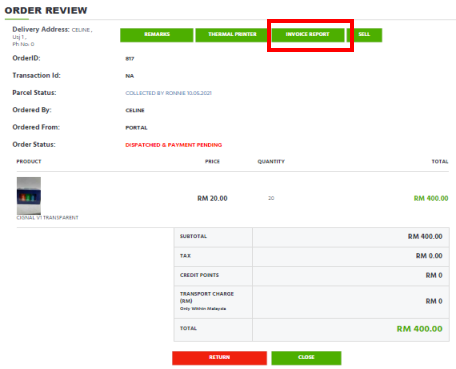
Click the Remarks button to view all remarks on this item.
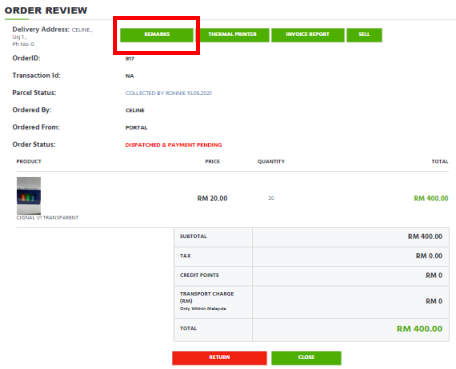
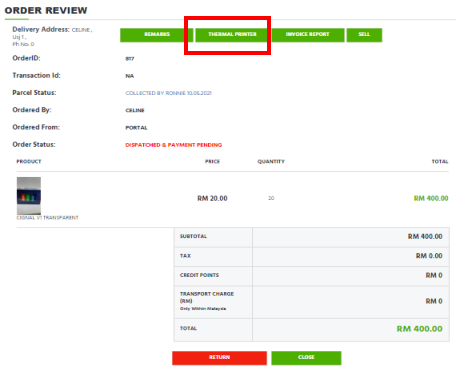
Click Invoice Report button to view or print the invoice.
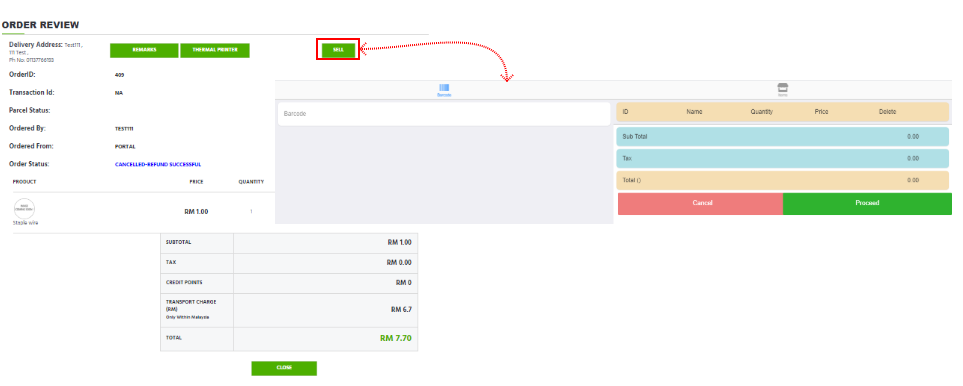
Note: Once you click the sell button on the order review page, it will go to POS home page.
On the RECEIVED ORDER page, you can do dispatch for the items.
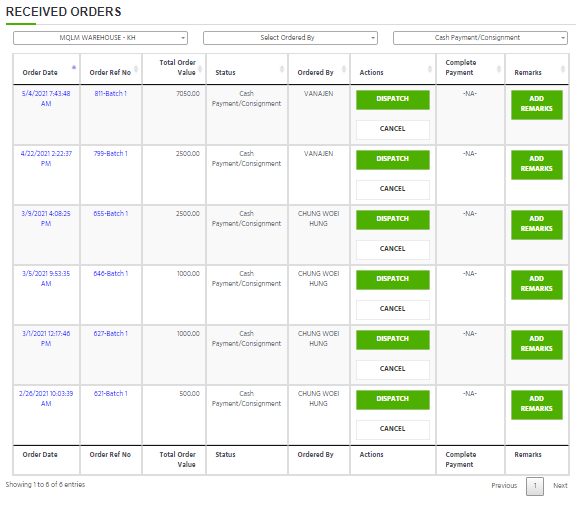
The Manufacturer/Distributor can select prefered delivery option and delivery service.
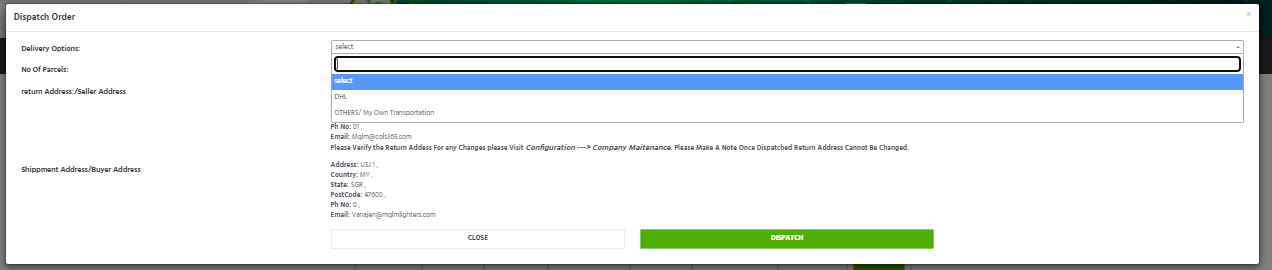
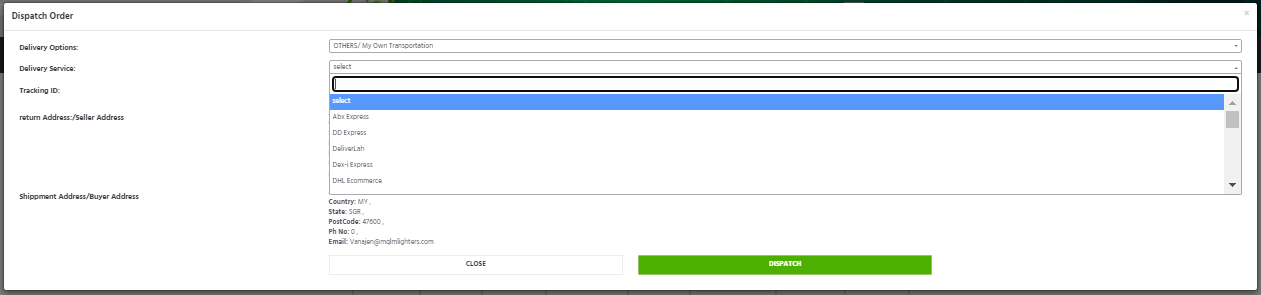
Manufacturer/Distributor must provide on tracking ID [incase Manufacturer/Distributor don't have tracking ID, COLS365 will provide it]. Details of Manufacturer/Distributor and shipment address must correct before click the DISPATCH button.
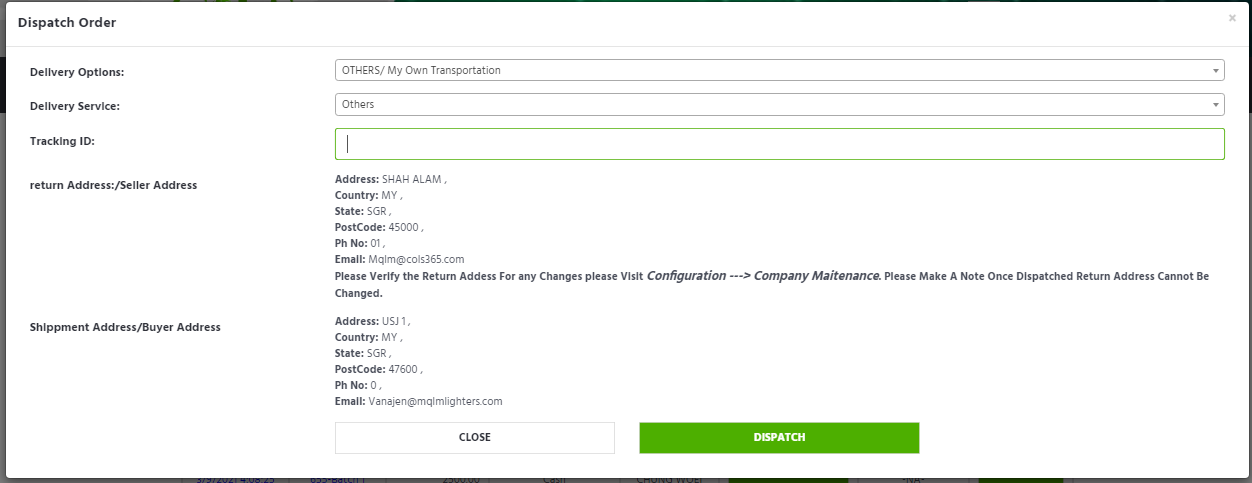
Once the RECEIVED ORDER is DISPATCHED using DHL manufacturer/distributor can view and download the label to print. Then can attached it on the parcel that for delivery. Note: This DHL label appear only once you choose DHL for your parcel delivery.

Note: Once the RECEIVED ORDER is DISPATCHED using other type of service and customer pay by cash or consignment, status will be dispatched and payment pending.
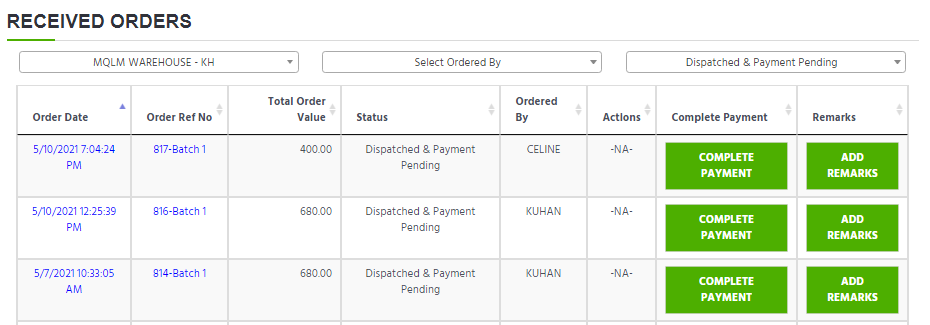
HOW TO RECORD THE PARTIAL PAYMENT OF CASH/CONSIGNMENT:
Step 1: On the dashboard click dispatched and payment pending button. Check the order ref. no which customer need to pay.

Step 2: Click the complete payment button.

Step 3: Type the partial amount paid by the customer and click save button.
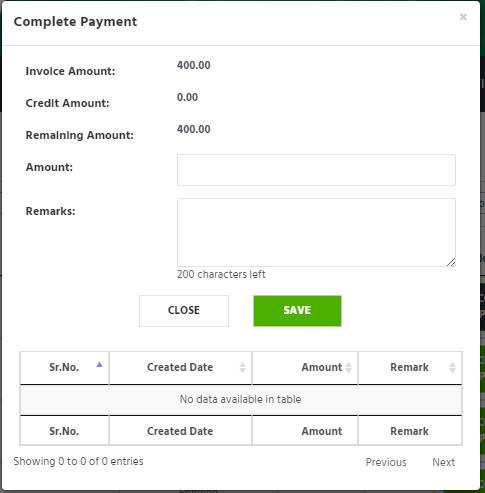
Note: History of partial payment will be recorded below. And Credit amount will be updated.
HOW TO DO REFUND TO CUSTOMER:
Once the customer pays thru IPAY88 and cancel the order after payment, the refund completed button will be appear. And to refund it completely click it and type the Transaction ID [Order Ref No.] and click save. Status will be change to Cancel-Refund Successful.

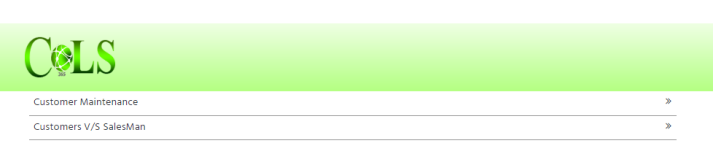
FUNCTION OF CUSTOMER BUTTON:
CUSTOMER page can view the Customer Maintenance and Customer V/S Salesman
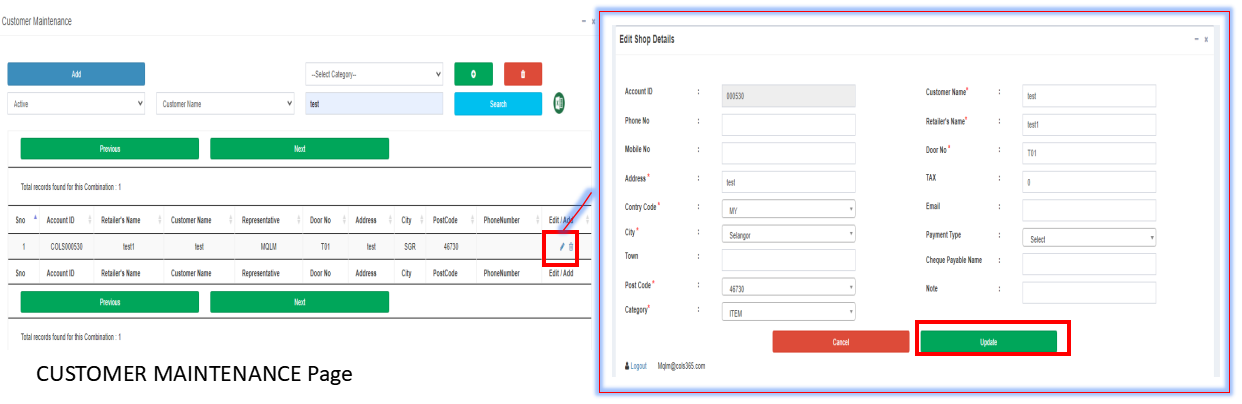
CUSTOMER MAINTENACE page can view all your customer details. Customer details can ADD using ADD button, EDIT using pen icon button and delete using dashbin button. And if you want to search customer details by customer name, address, post code, city and account ID and then just click search button.
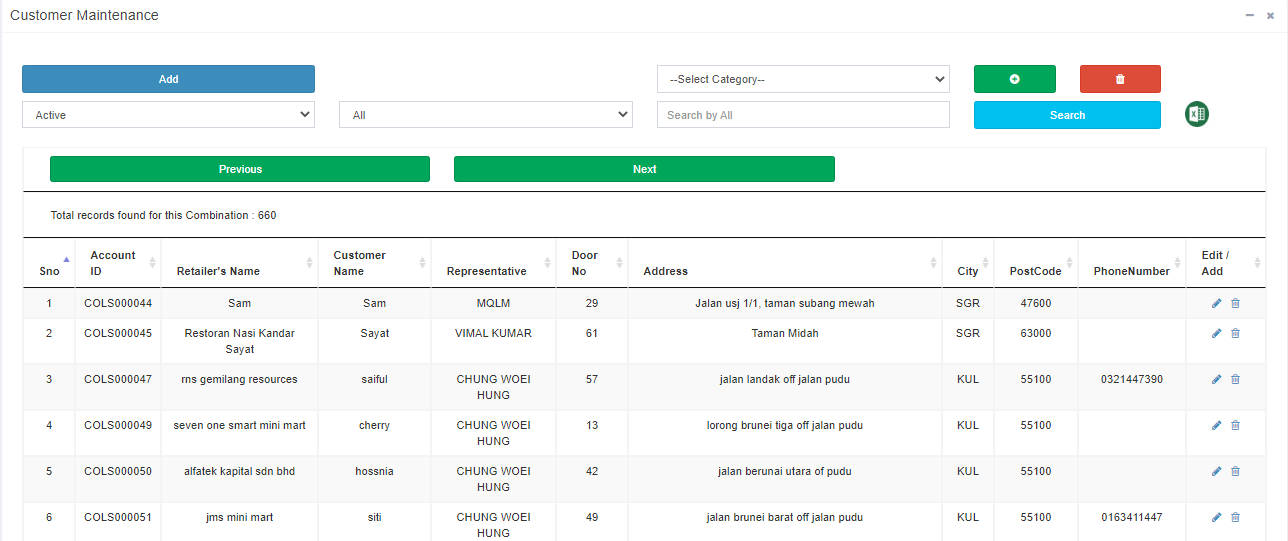
Adding a customer must click the add button.

Fill-up the form. Then click the save button.

Searching a customer details must select by customer name, address, post code, city and account ID then type on the box the details you want to search and click the search button.

EDIT a customer details must click the pen icon. Fill up the changes and click update button.
On CUSTOMER MAINTENANCE, you can delete your customer information by clicking the dust bin icon.

Note: Deleted customer details, means it will be inactive only so that in the future if you need it again you can enable it back. To see inactive customer details must select only inactive.
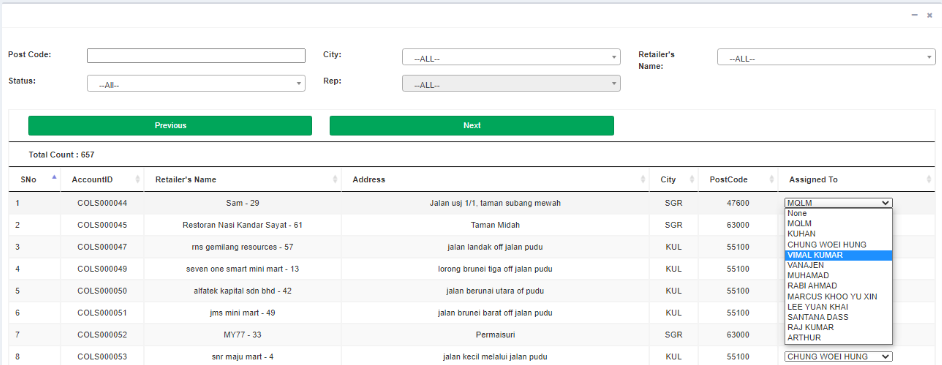
CUSTOMER V/S SALESMAN page can view all your customer details and can assigned it on respective distributor or seller.
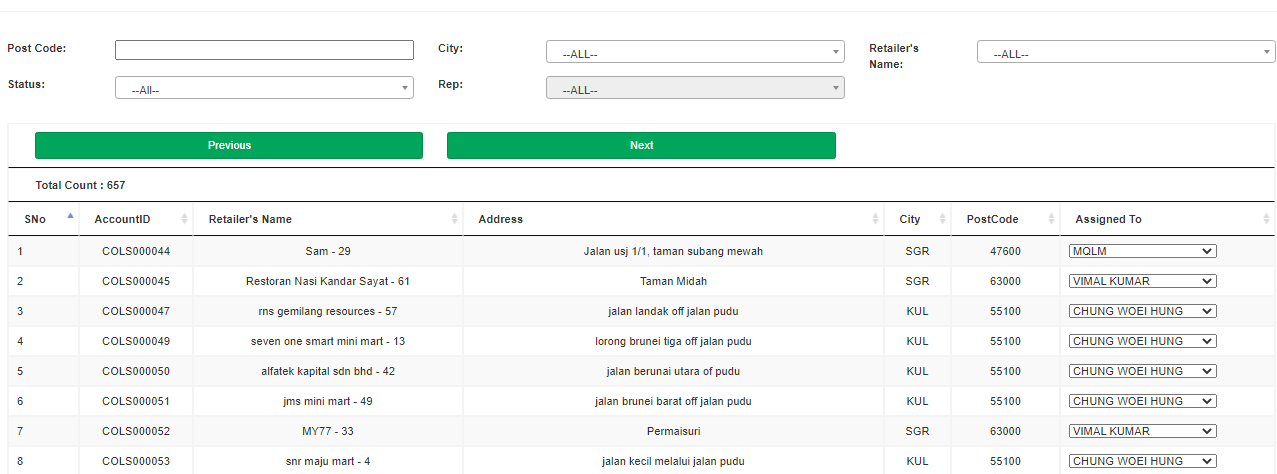
Note: Customer V/S Salesman screen we will display below member info - if the login user is Distributor then the Assigned To dropdown will consist of distributor member info that is under him. - if the login user is Manufacturer then the Assigned To dropdown will consist of distributor member info that is under him.
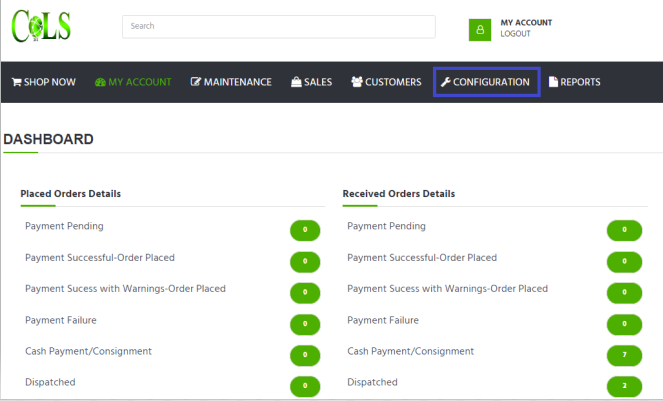
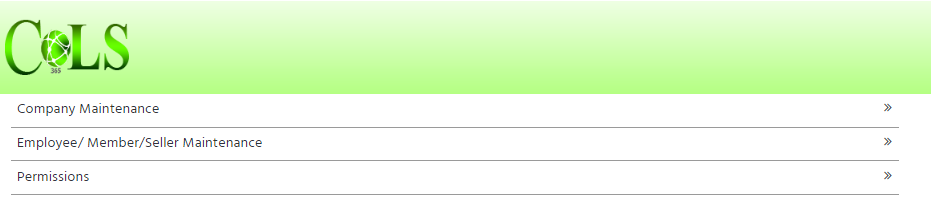
FUNCTION OF CONFIGURATION BUTTON:
CONFIGURATION can view the Company Maintenance, Employee/Member/Seller Maintenance and Permissions.
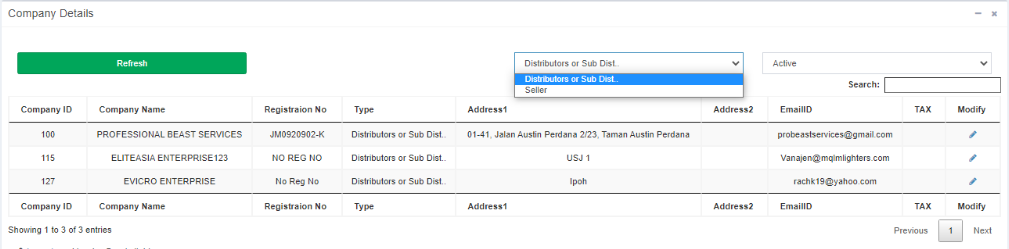
Company Maintenance can view all manufacturers/distributors.
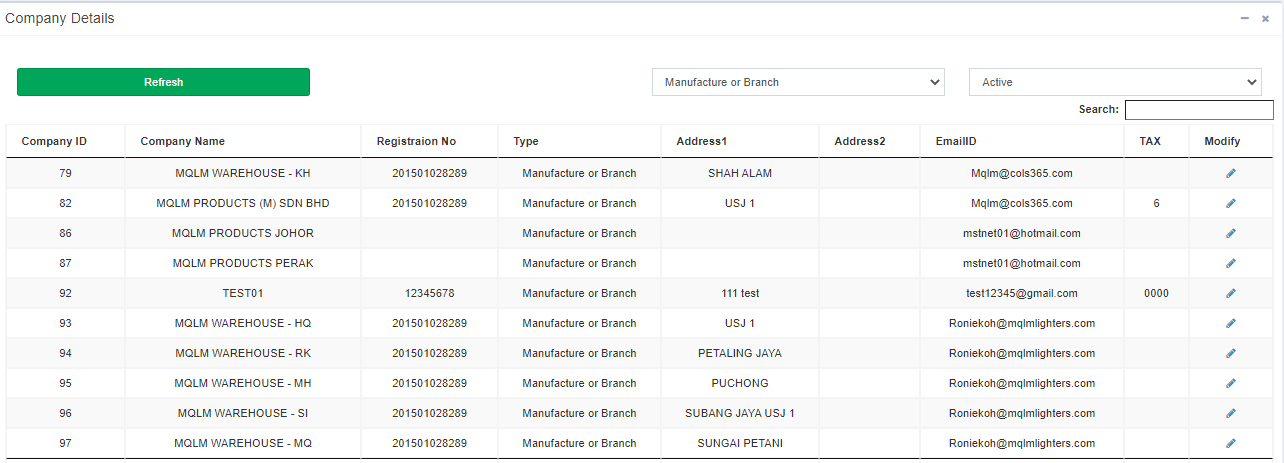
If you log in as a manufacturer you can view all manufacturer branch, distributors, and seller details.

But if you log-in as Distributor you can view distributors and seller details only.
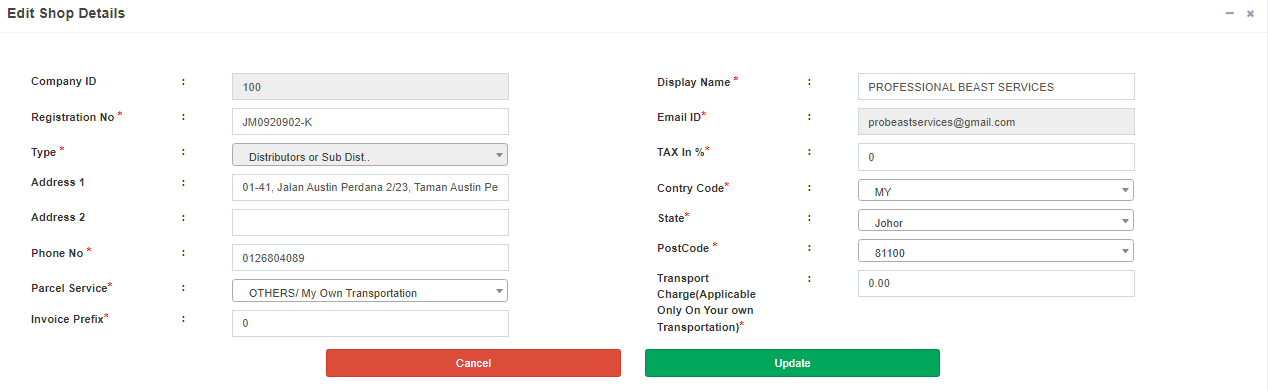
HOW TO EDIT COMPANY DETAILS:
Step 1: Click the pen icon to edit the company details
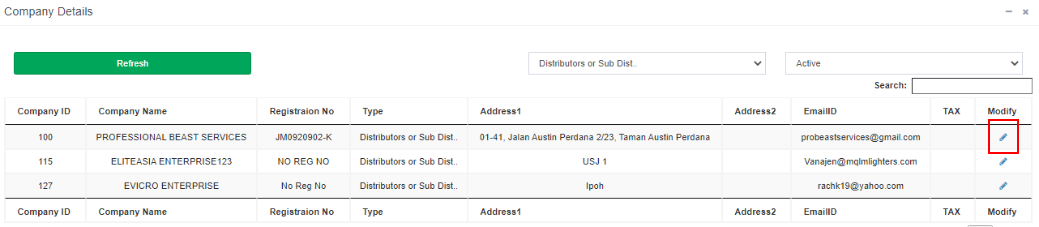
Step 2: Change the specific item you want to update and click the update button.
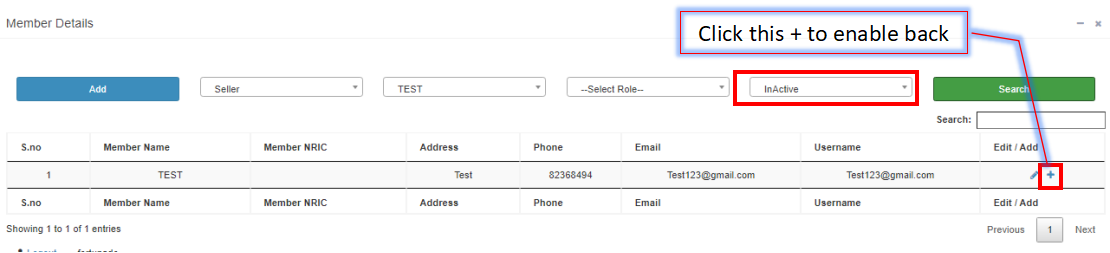
EMPLOYEE/MEMBER/SELLER Maintenance can view all company member and seller details. You can search here your member by company/branch or seller.
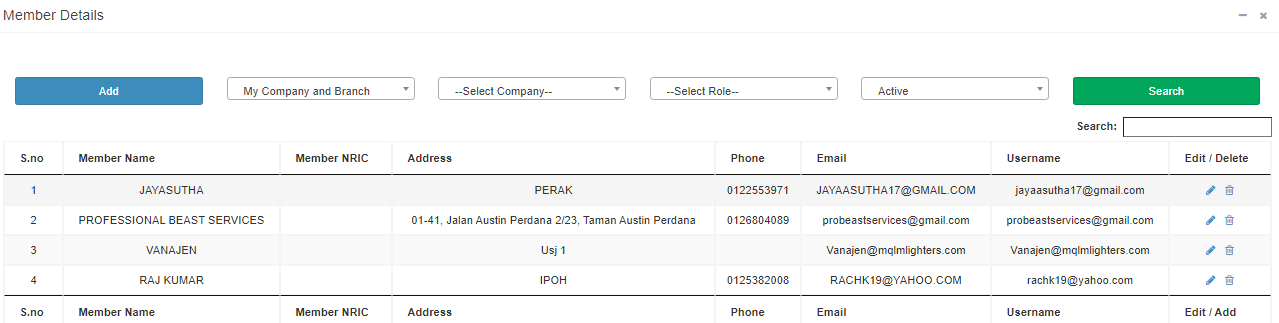
HOW TO SEARCH EMPLOYEE/MEMBER/SELLER:
Step 1. Choose on My Company and Branch or Seller dropdown.
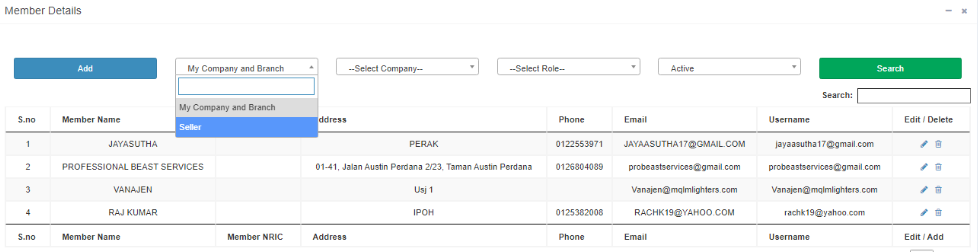
Step 2: Select company name on drop down.

Step 3: Select the role on drop down.
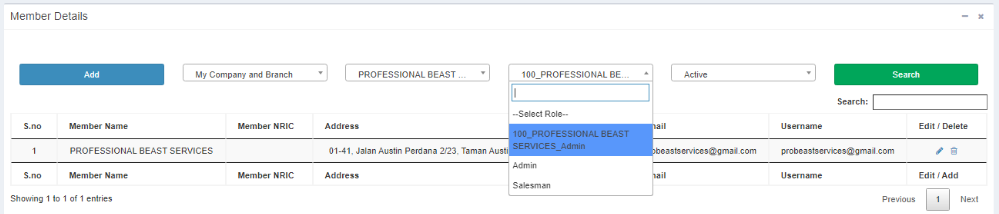
Note: Last dropdown selection is status of member if you looking active or inactive member/seller [inactive means member/seller that you deleted]

Step 4: Click search button.

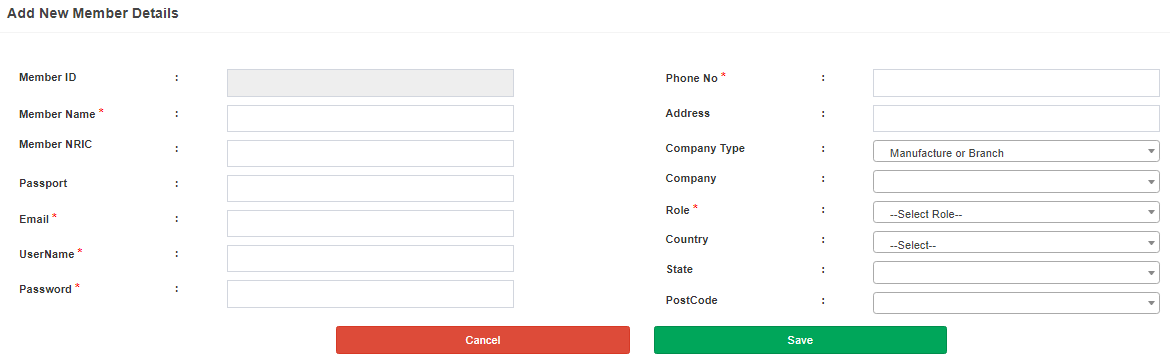
HOW TO ADD NEW MEMBER:

Step 2: Once done fill-up the form then click the save button
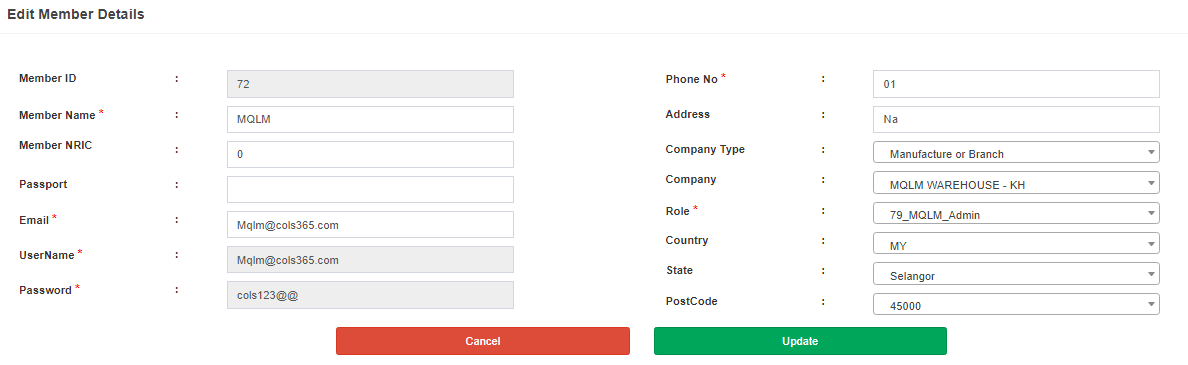
HOW TO EDIT MEMBER DETAILS:
Step 1: Click PEN icon to edit member details.

Step 2: Once done fill-up the form then click save button.
On EMPLOYEE/MEMBER/SELLER Maintenance, you can delete your member/seller information by clicking the dust bin icon

Note: Deleted member/seller details, means it will be inactive only so that in the future if you need it again you can enable it back. To see an inactive member/seller details must select only inactive.
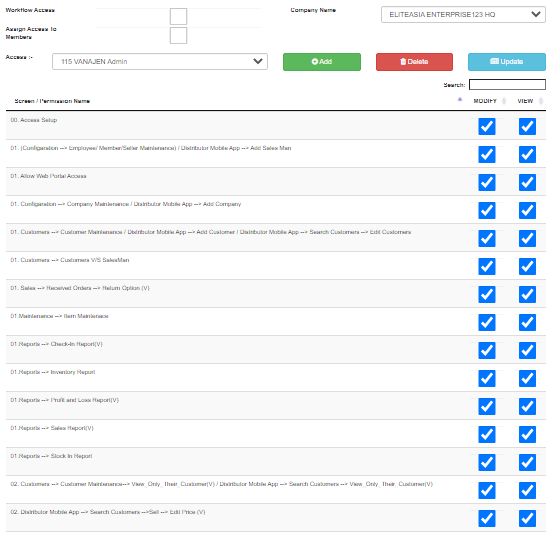
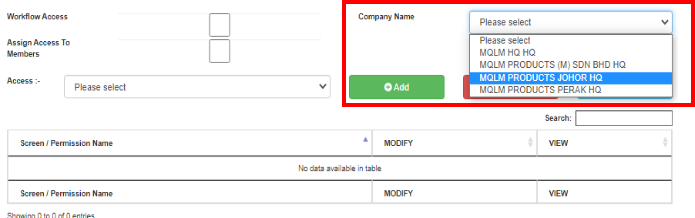
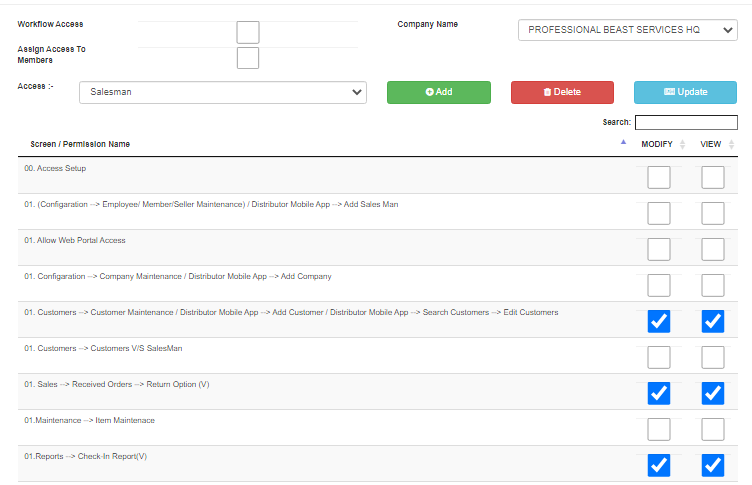
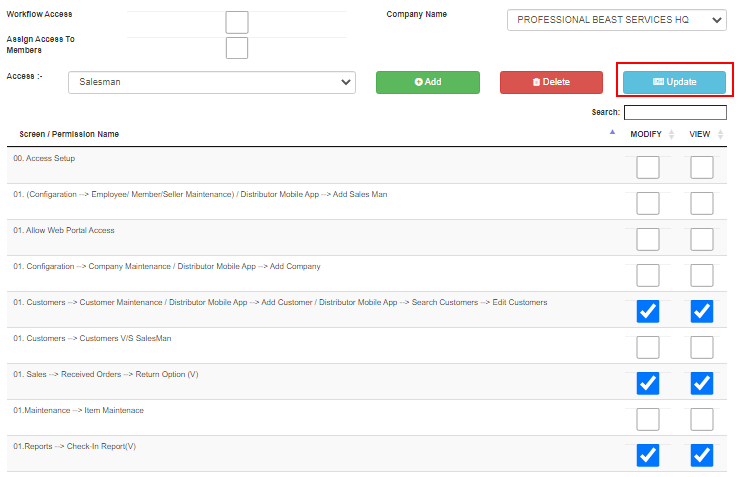
PERMISSION Page can help the manufacturer/distributor to give access or restriction to a member/seller.
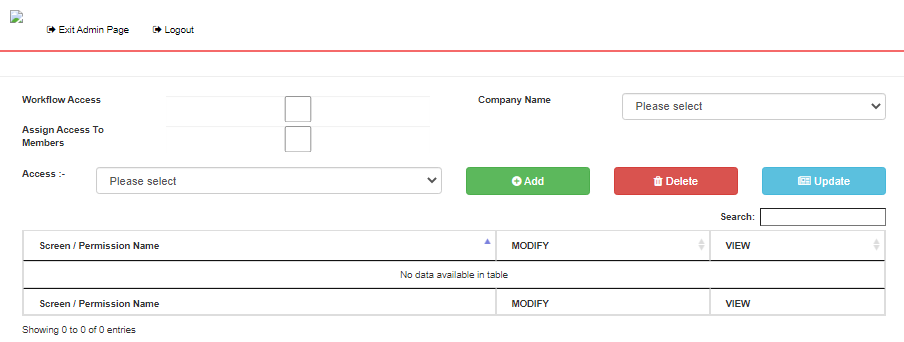
HOW TO VIEW THE SETTING:
Step 1: Select company name on drop down.
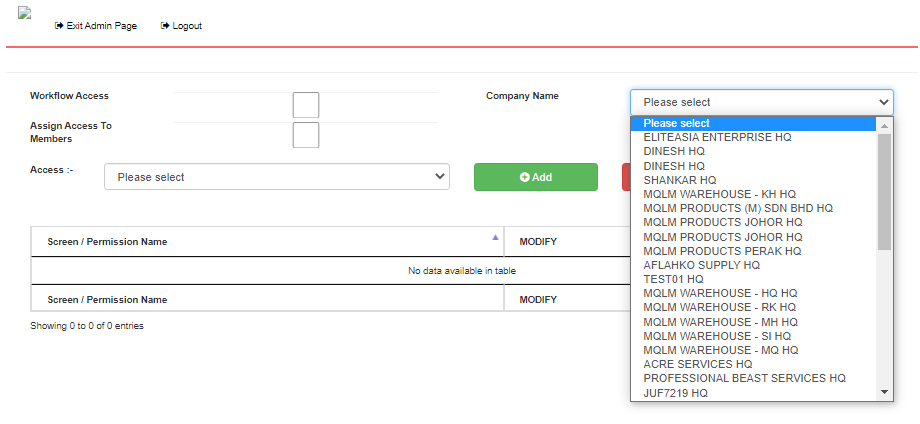
Step 2: Select access on drop down.
Step 3: In case have changes on setting just check/uncheck the box [modify/view] then click update button.
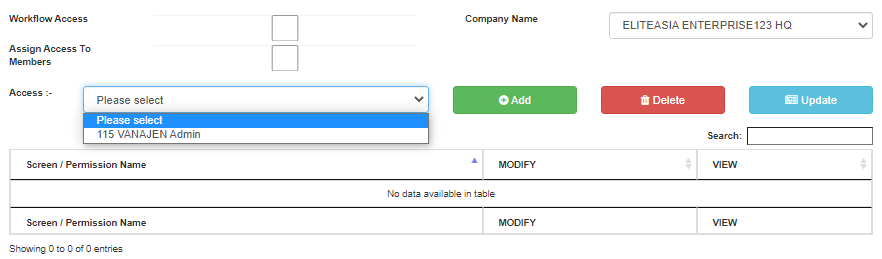
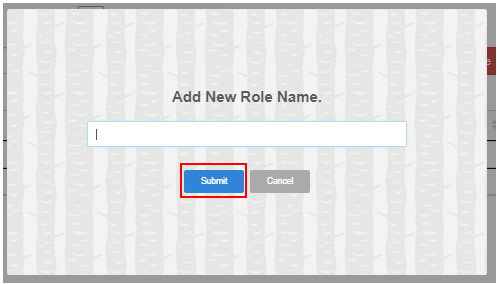
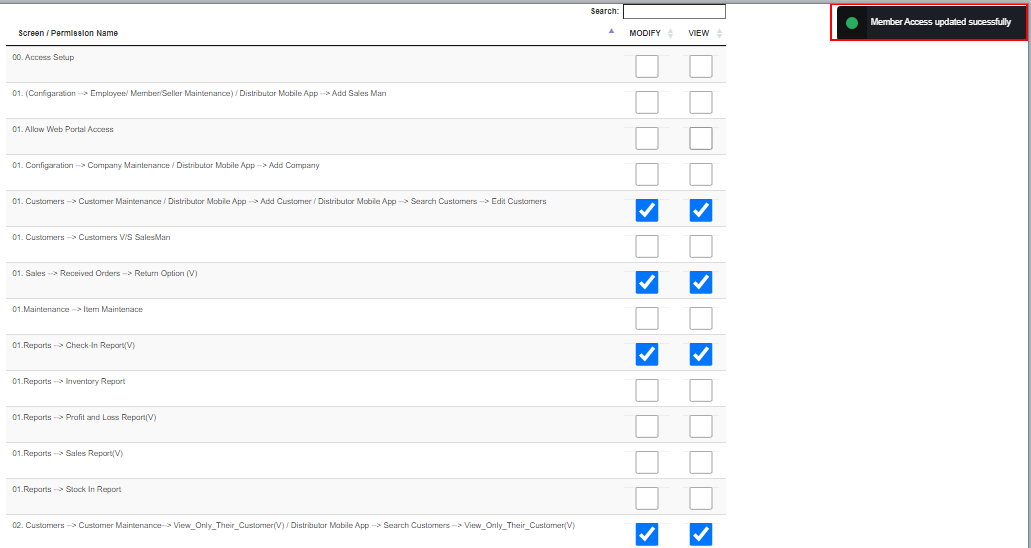
HOW TO ADD NEW ROLE:
Step 1: Select company name and click add button.
Step 2: Type new role name and click submit button.
Step 3: Select new created role name on the Access dropdown.
Step 4: Check all necessary access for your member/seller.
Step 5: Click update button and pop-up message will appear on the top right of the screen “Member Access updated successfully
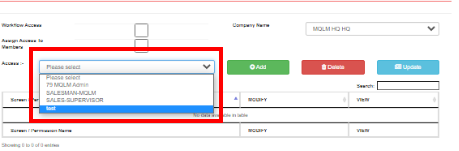
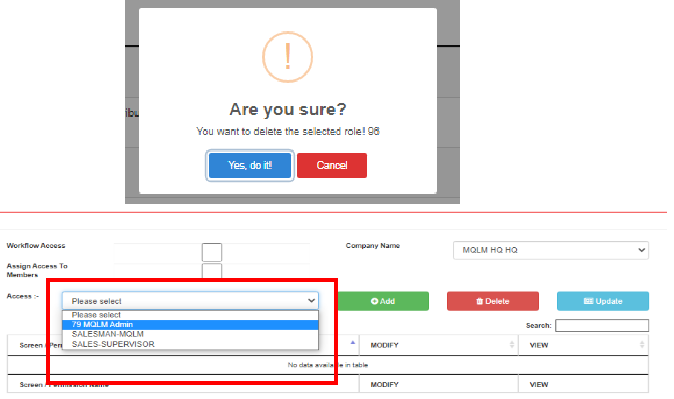
HOW TO DELETE MEMBER ACCESS:
Step 1: Select company name on drop down.
Step 2: Select access on drop down.
Step 3: Click delete button.
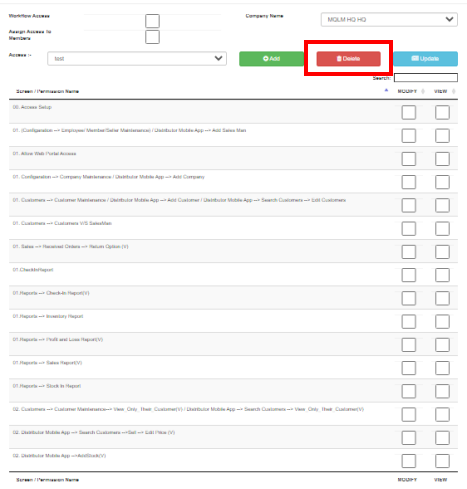
Step 4: Click yes button and it will not appear on access selection.
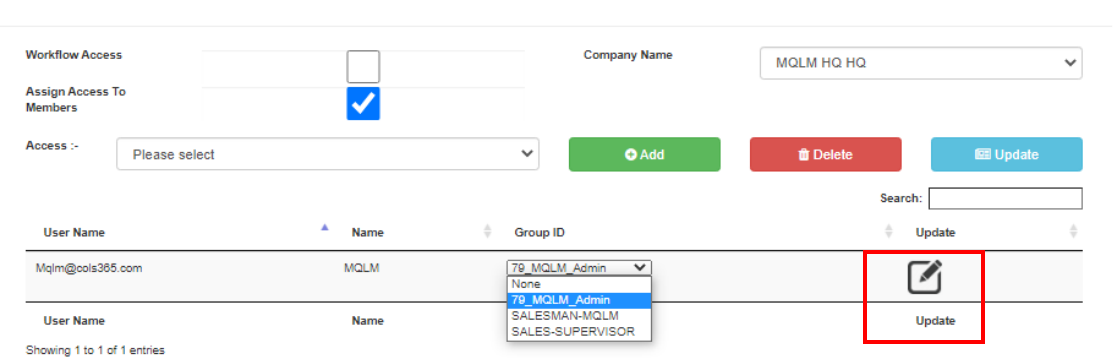
HOW TO ASSIGN ACCESS TO MEMBERS:
MANUFACTURER/DISTRIBUTOR can assign access to members.
Step 1: Select company name on drop down.
Step 2: Just check the box on Assigned Access to Members
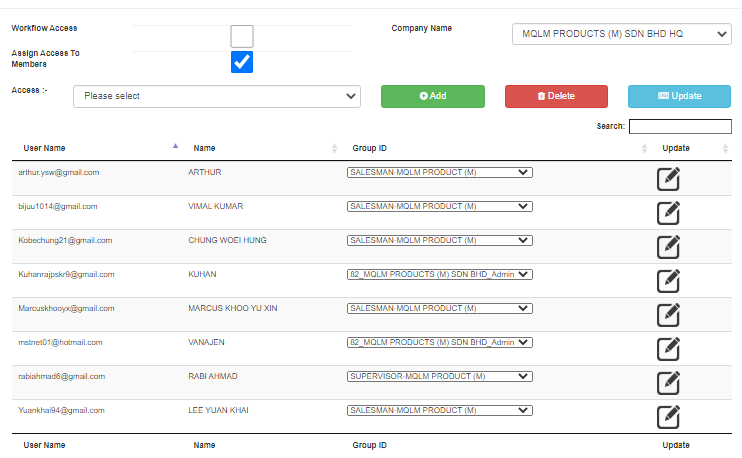
Step 3: Go to group id selection drop down and select designated access [admin access, salesman access, none, or supervisor].
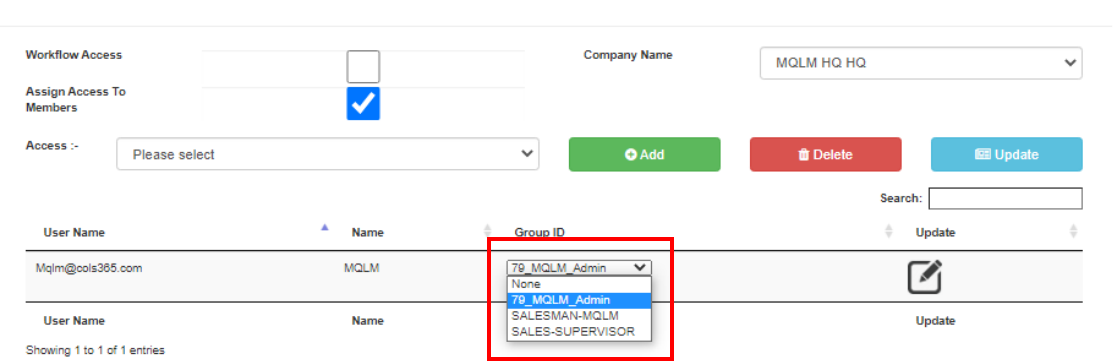
Step 4: Then click the pen icon to update.
HOW TO ACTIVATE THE RETURN BUTTON:
MANUFACTURER/DISTRIBUTOR only can do permission to activate the return button incase the customer request to return the items.
Step 1: On permission page, Select company name.
Step 2: Select Admin Access.
Step 3: Find Sales -> Received Orders -> Return Option and check the box on the VIEW box
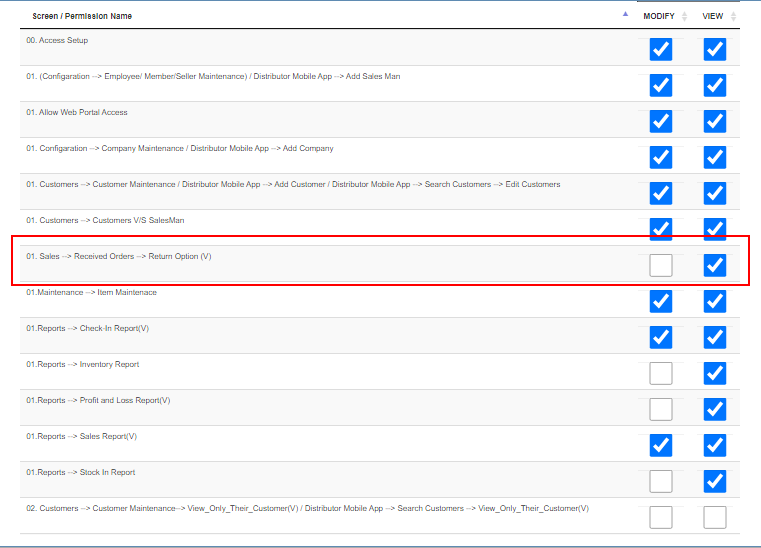
Step 4: Click the Update button then close the permission page.
Step 5: Click Sales then go to RECEIVED ORDERS.
 Step 6: Click the order ref. no. on the RECEIVED ORDER LIST that the customer request need to return.
Step 7: Click Return Button.
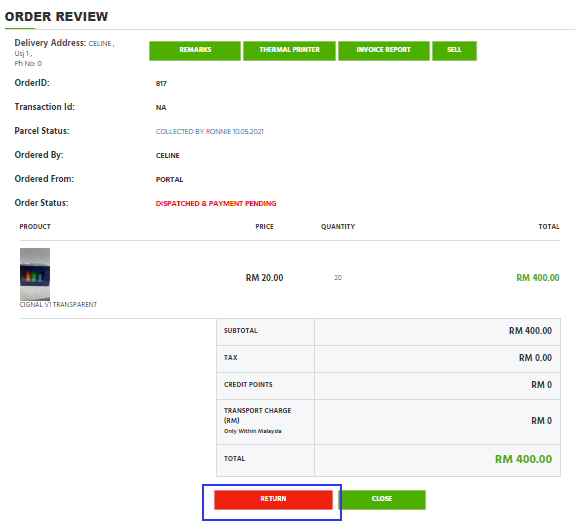
Step 8: Input the return item quantity.
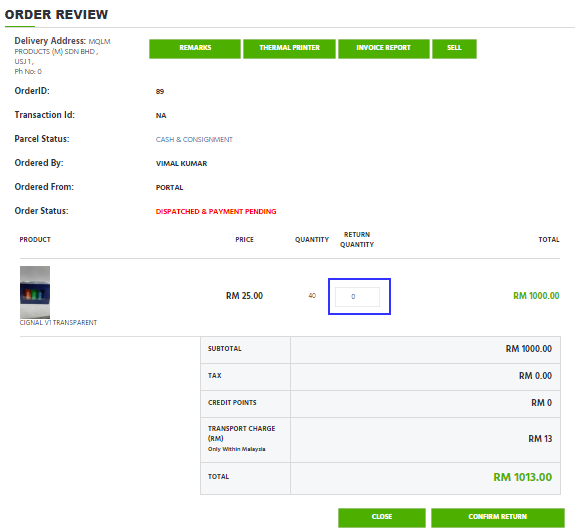
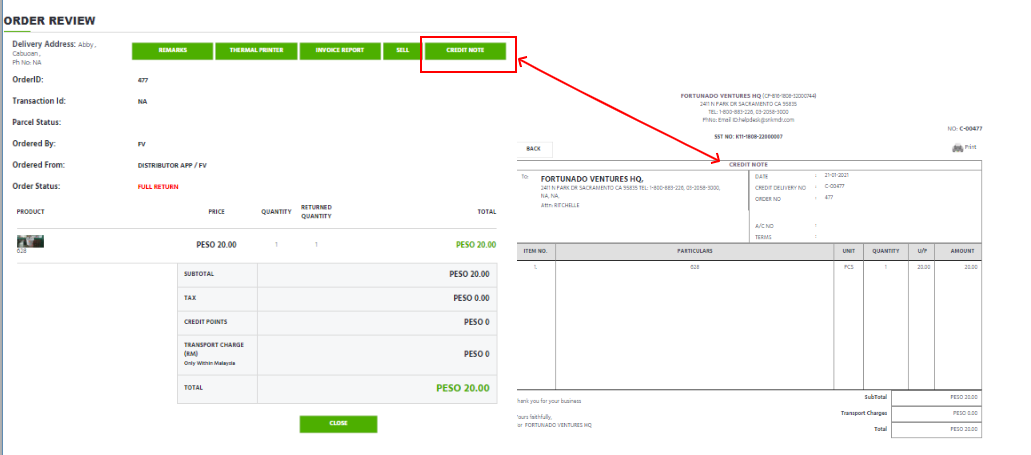
Step 9: Click confirm return button. Then order status will be full return and credit note button will appear on order review page.
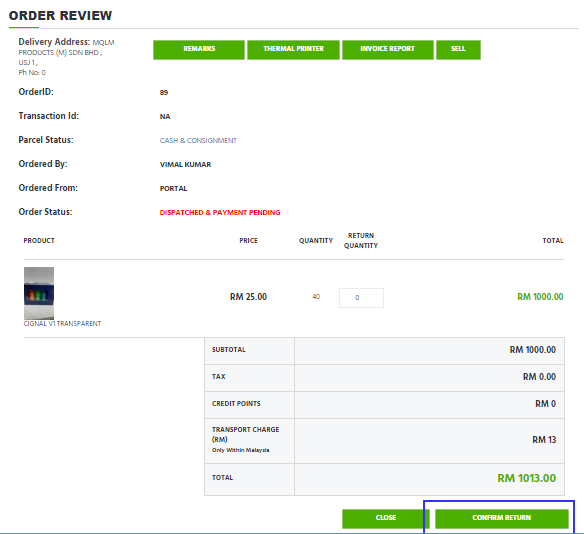
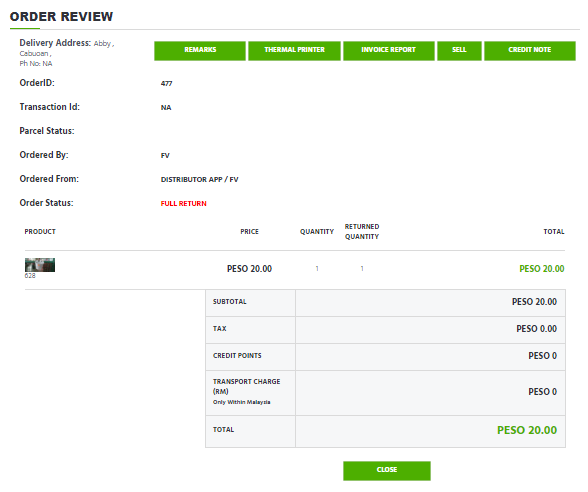
Note: MANUFACTURER/DISTRIBUTOR can print the credit note after confirming the return by clicking credit note button.
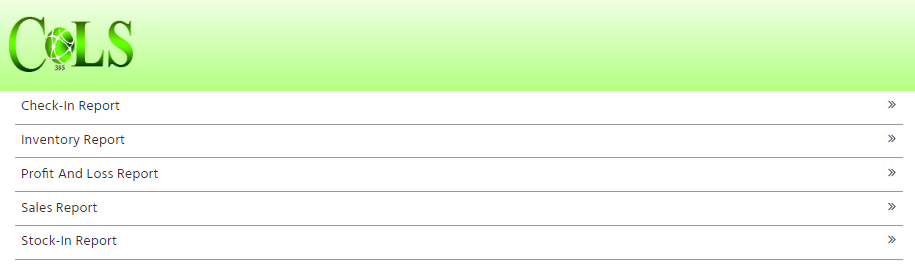
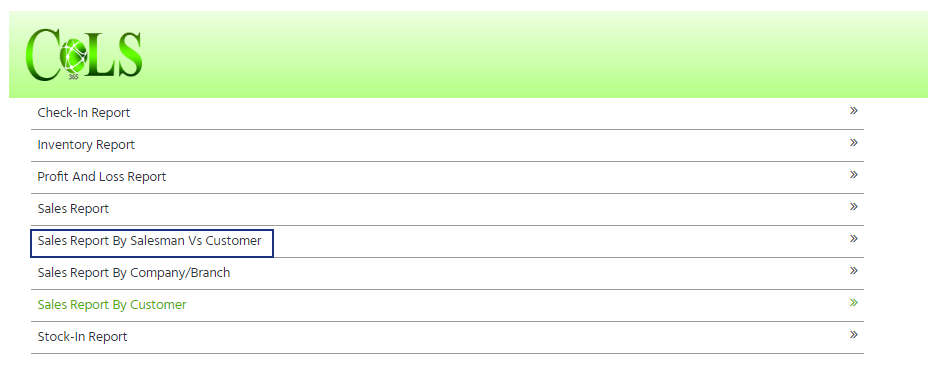
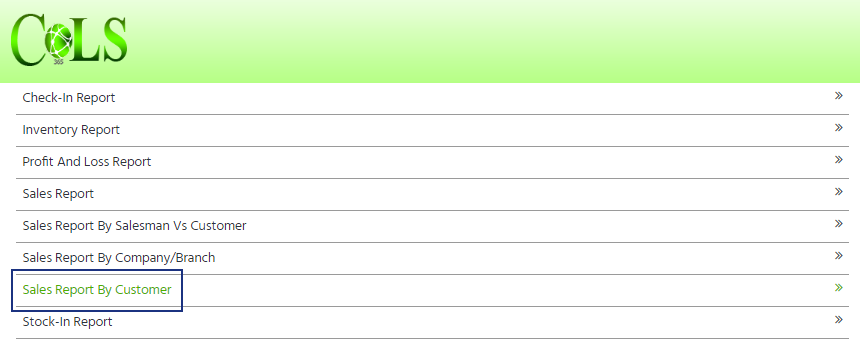
FUNCTION OF REPORTS BUTTON:
REPORT PAGE can view the Check-In report, Inventory report, Profit and Loss report, Sales Report and Stock-In Report.
CHECK-IN REPORT:
MANUFACTURER/DISTRIBUTOR can view and monitor the history of the member/seller where shop they go and what time they come on the shop.
Step 1: On the Check-In Report Page, select on drop-down From what date and To what date you want to view.
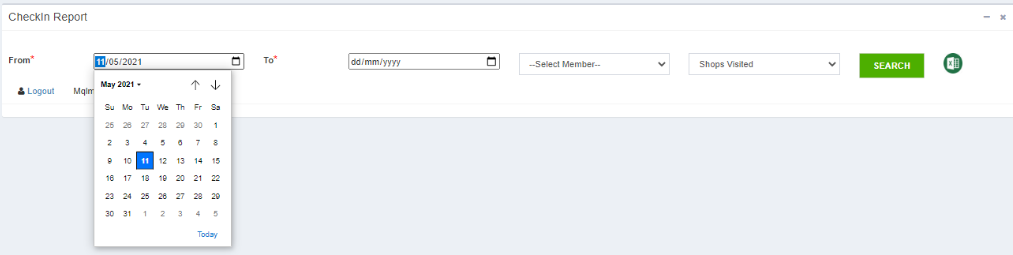
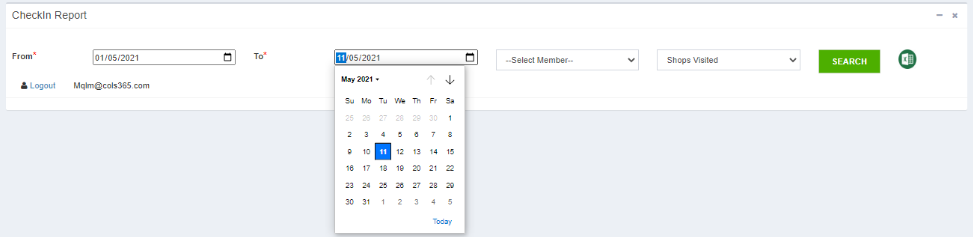
Step 2: Select member/seller name Note: Select member alone(if a user is a distributor then the distributor member list will be available, if a user is a Manufacturer then the Manufacturer member list will be available)

Step 3: Choose what you want to view if Shop Visited or Shop Not visited.

Step 4: Click Search Button to view your data needed.

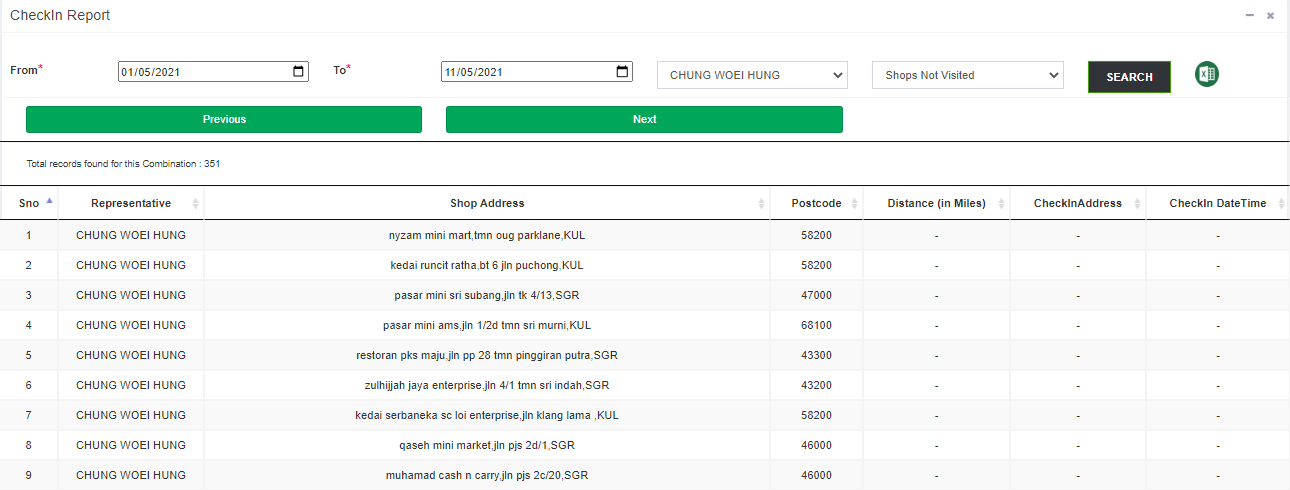
Note: If you want to export the data after search just click the excel icon.


INVENTORY REPORT:
MANUFACTURER/DISTRIBUTOR can view and monitor the remaining stocks by month, by specific date, and by year.
Step 1: On the Inventory Report Page, select on drop-down From what date and To what date you want to view or select the button of current year, current month, last month or last year.

Step 2: Click Search button.

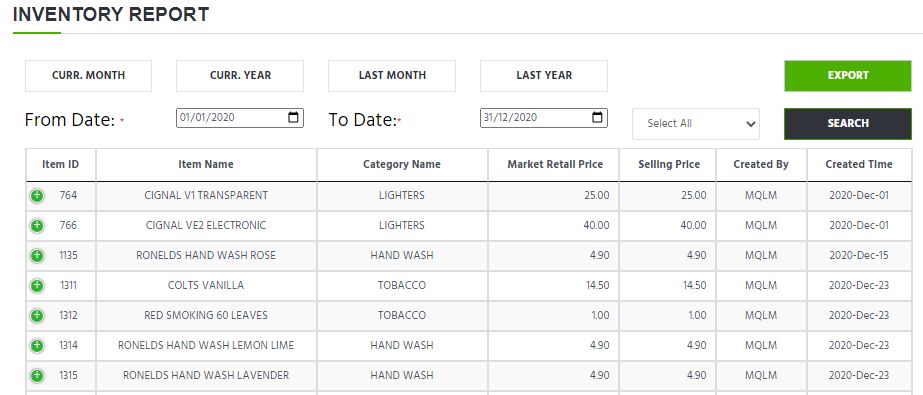
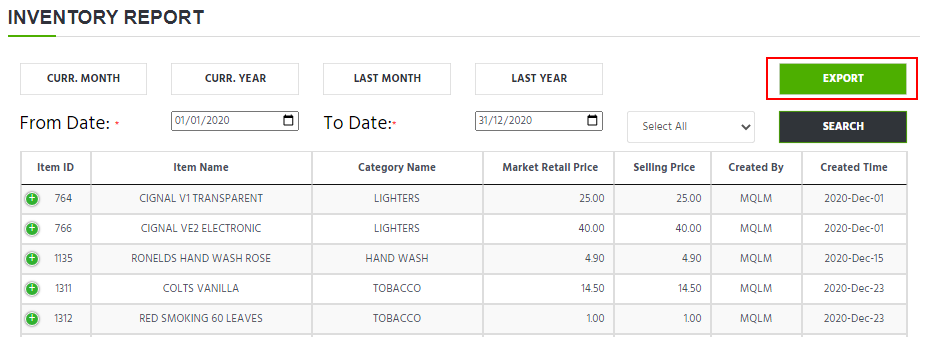
Note: If you want to export the data after search just click the export button.
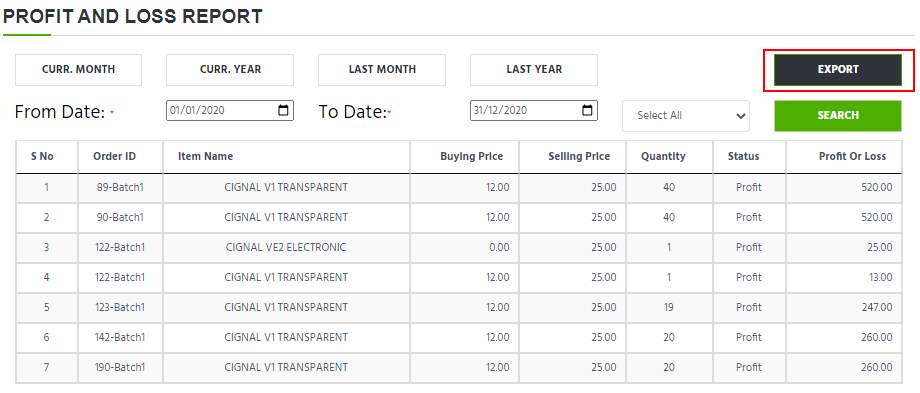
PROFIT & LOSS REPORT:
MANUFACTURER/DISTRIBUTOR can view and monitor the business if got profit or loss by month, by a specific date, and by year.
Step 1: On the Profit & Loss Report Page, select on drop-down From what date and To what date you want to view or select the button of current year, current month, last month or last year.

Step 2: Click Search button.

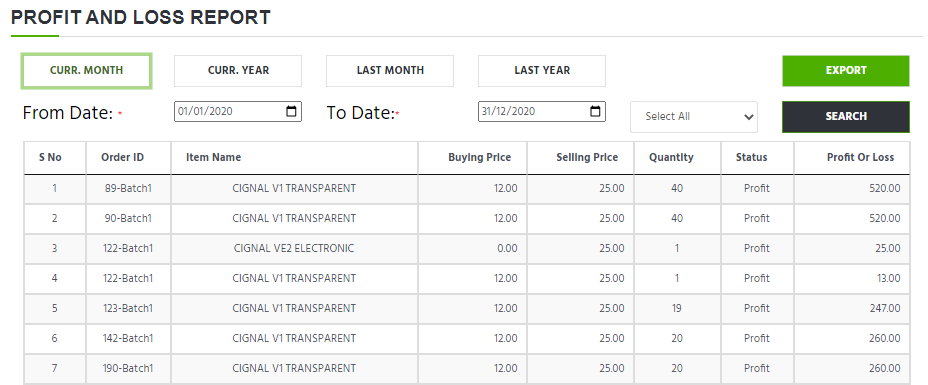
Note: If you want to export the data after search just click the export button.

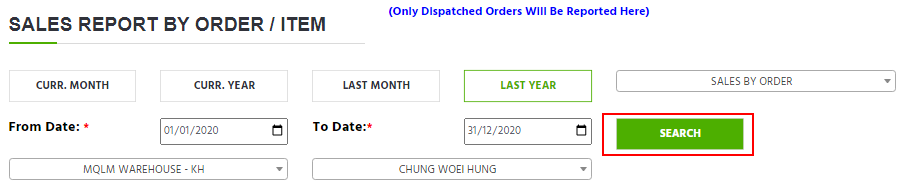
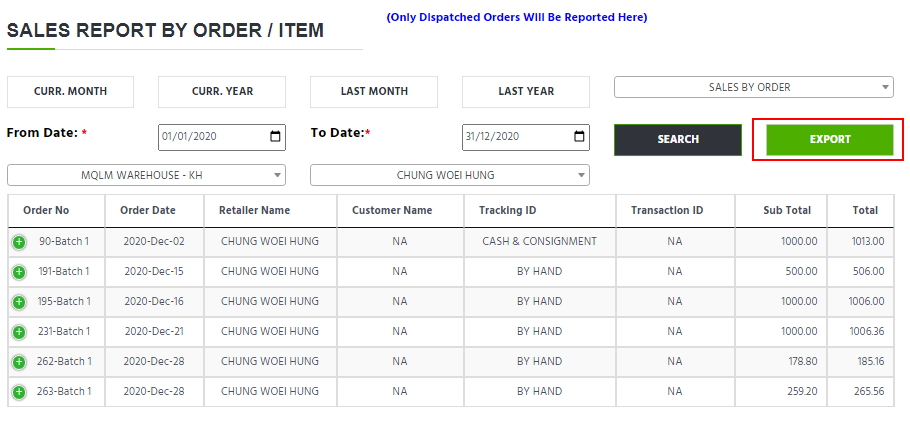
SALES REPORT:
MANUFACTURER/DISTRIBUTOR can view and monitor the Sales by month, by specific date, and by year. Sales report can search by order, by item, by company and by salesman.
Step 1: On the Sales Report Page, select on drop-down From what date and To what date you want to view or select the button of current year, current month, last month or last year.
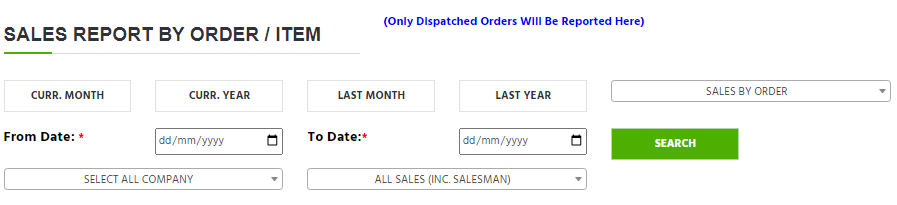
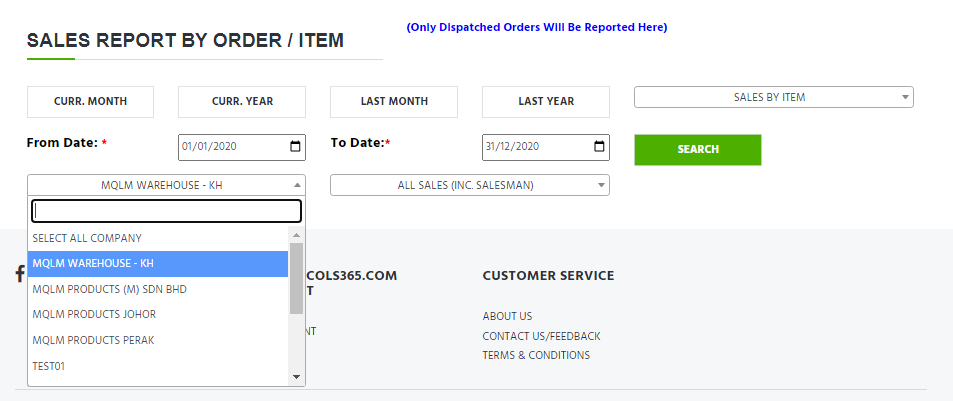
Step 2: Select on drop down if you want to search by order or by item.
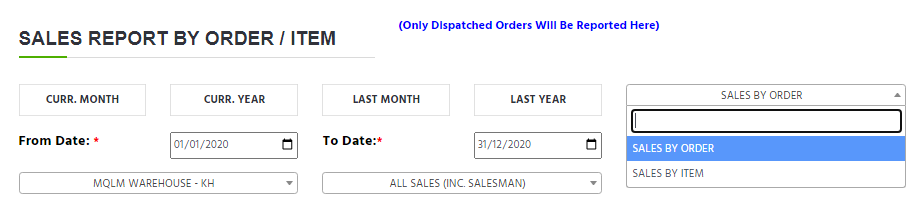
Step 3: Select company you want to view the sales.
Step 4: Select a salesman you want to view the sales report.
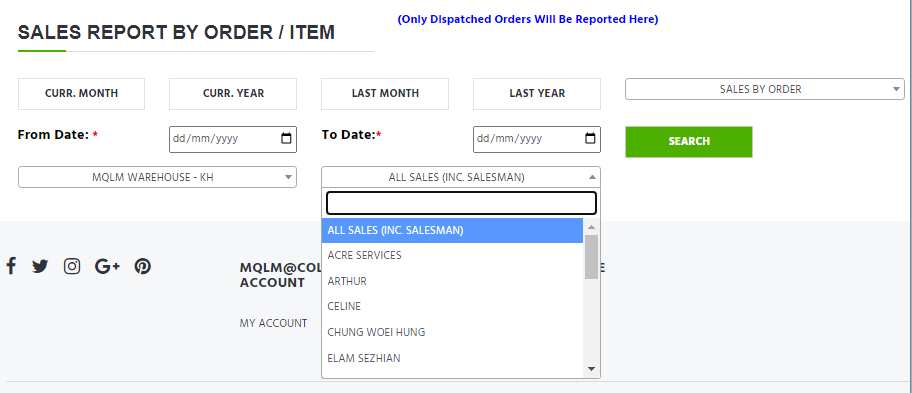
Step 5: Click the Search button.
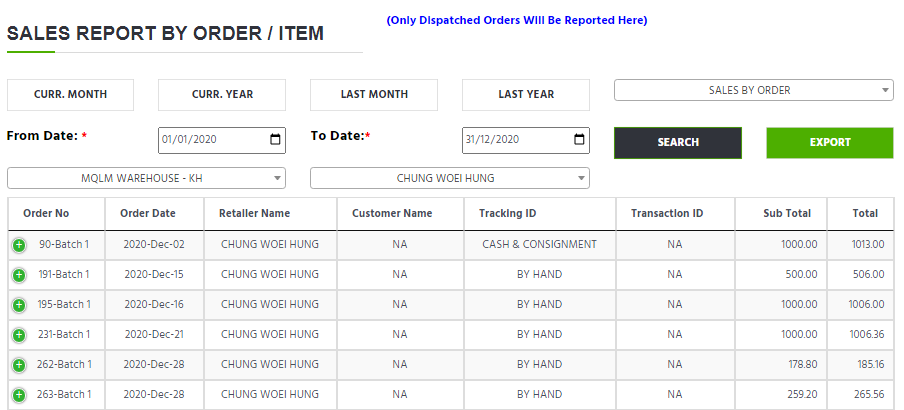
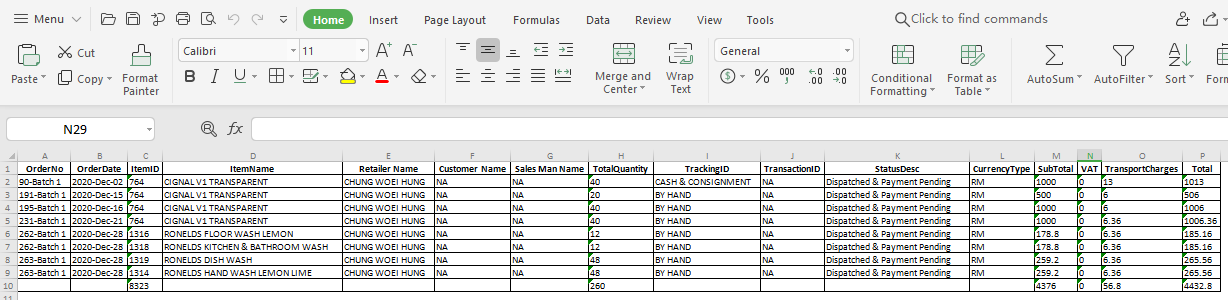
SALES REPORT BY ORDER
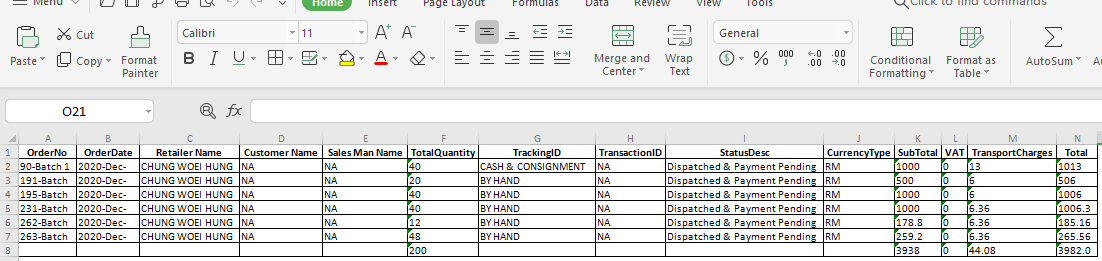
SALES REPORT BY ITEM
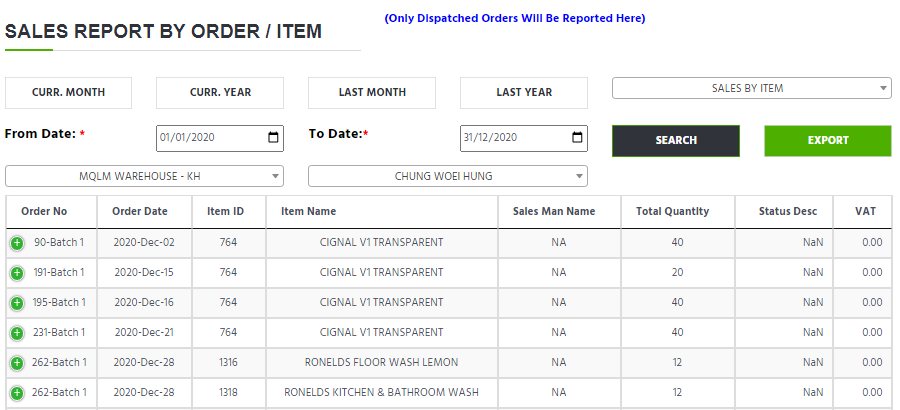
Note: If you want to export the data after search just click the export button.
SALES REPORT BY ORDER
SALES REPORT BY ITEM
SALES REPORT BY SALESMAN VS CUSTOMER:
Step 1: On Report menu page, click the SALES REPORT BY SALESMAN VS CUSTOMER.
Step 2: Select on drop-down From what date and To what date you want to view or select the button of current year, current month, last month or last year.
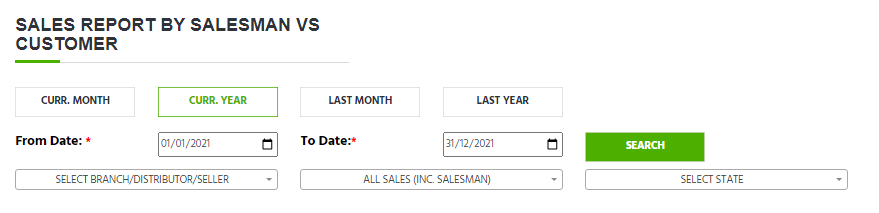
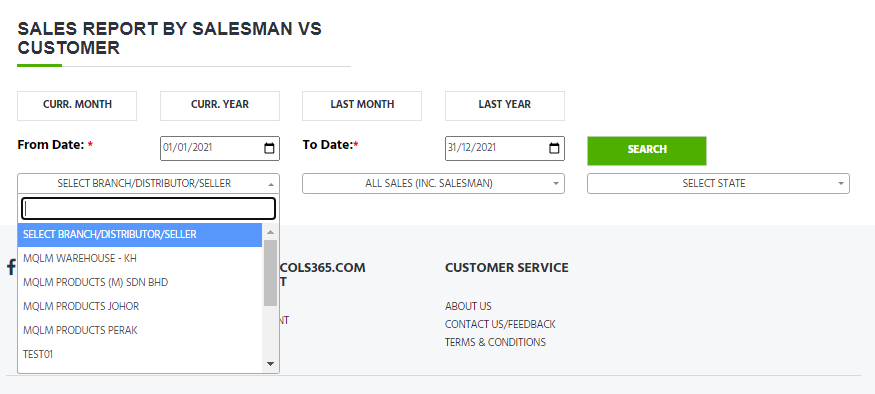
Step 3: Select on drop down the company branch/distributor/seller you want to check.
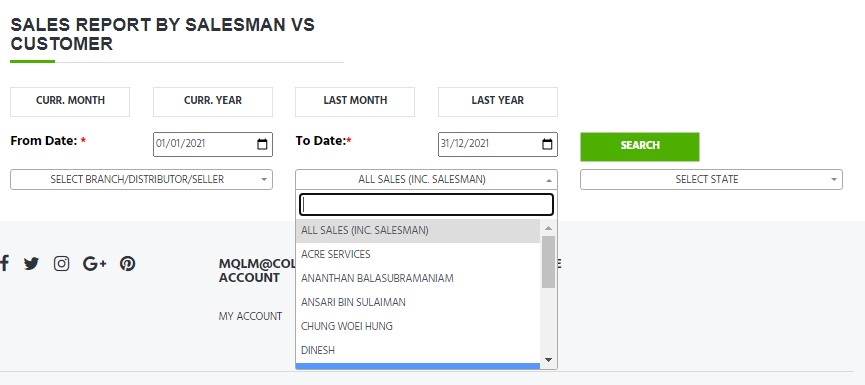
Step 4: Select on drop down the salesman you want to check.
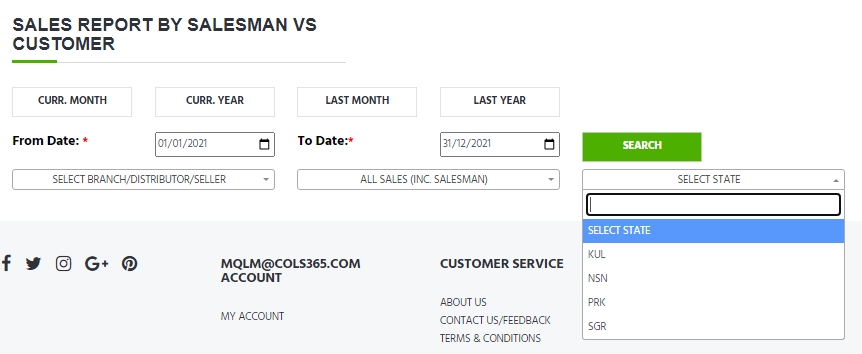
Step 5: Select on drop down which state you want to check.
Step 6: Click search button.
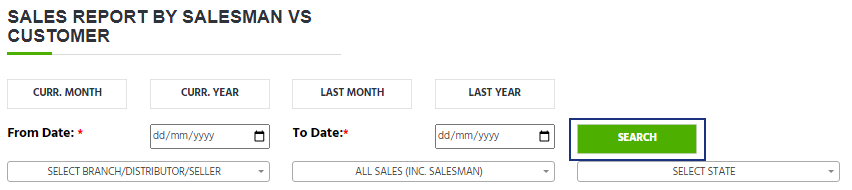
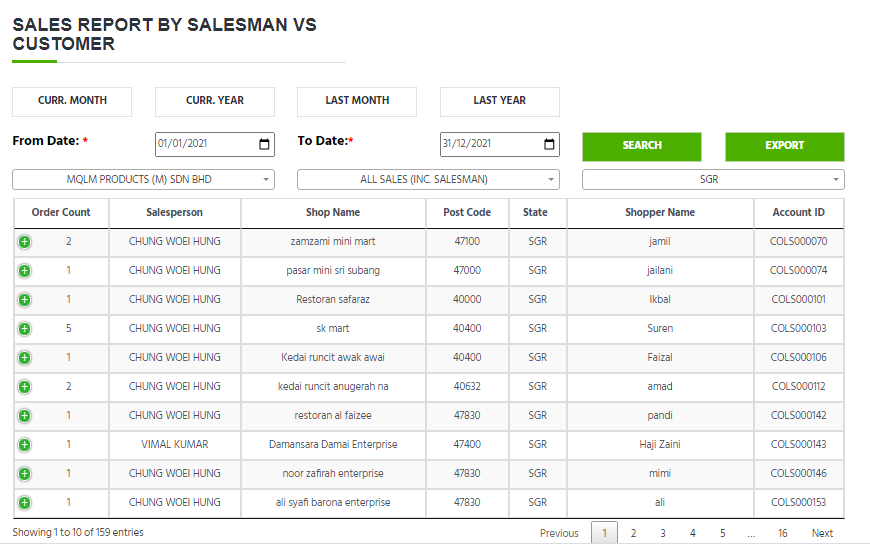
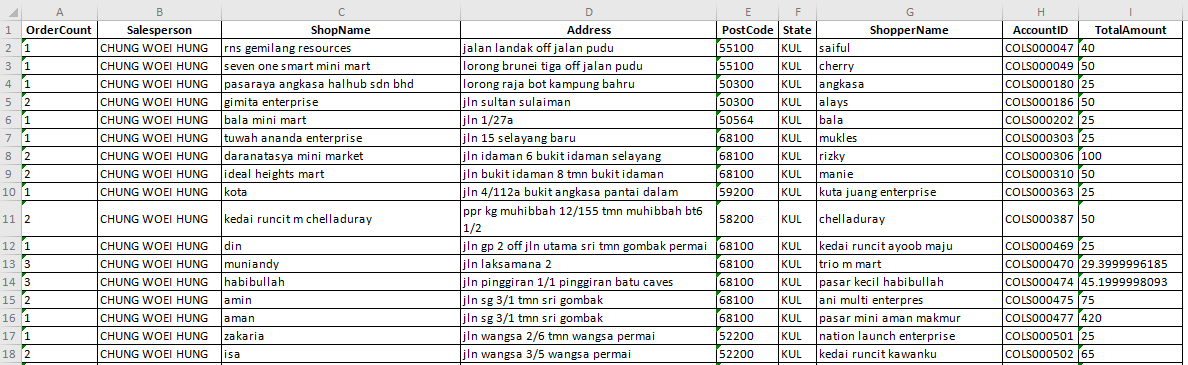
Note: If you want the excel report, just click export button.
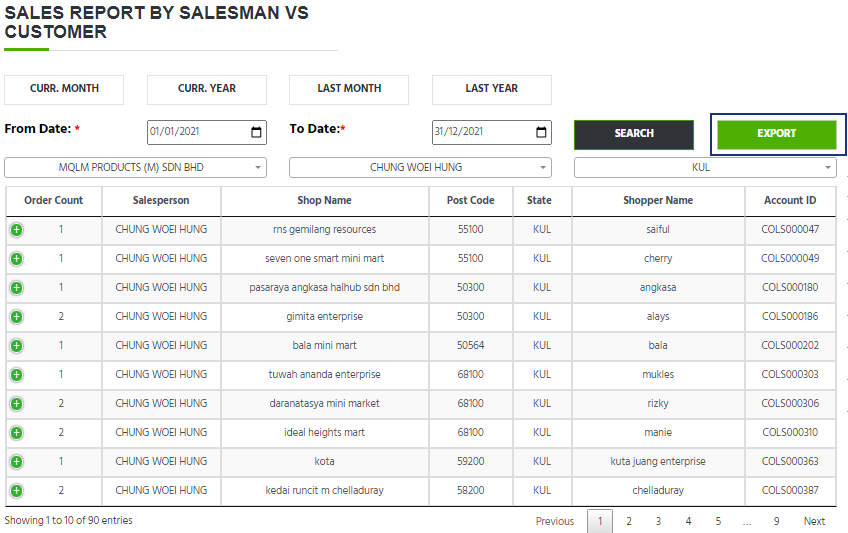
Sample Excel Report:
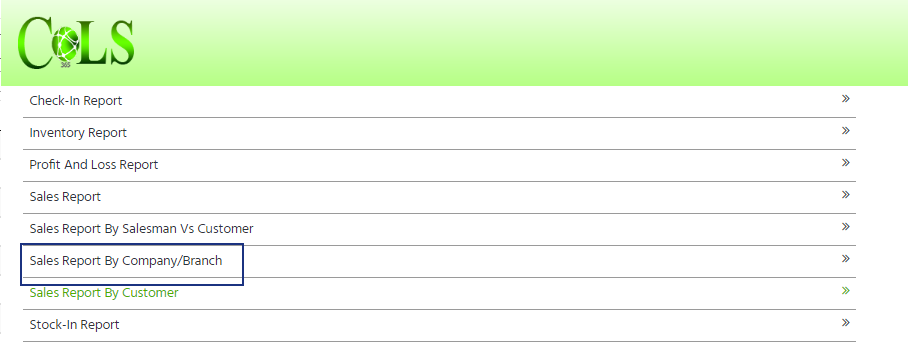
SALES REPORT BY COMPANY/BRANCH:
Step 1: On Report menu page, click the SALES REPORT BY COMPANY/BRANCH.
Step 2: Select on drop-down From what date and To what date you want to view or select the button of current year, current month, last month or last year.
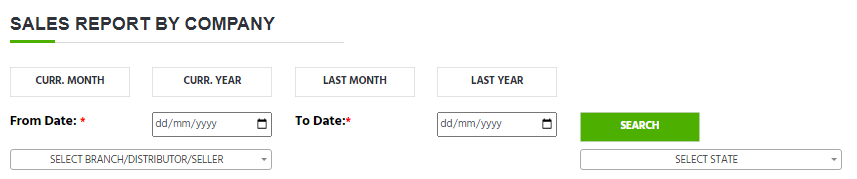
Step 3: Select on drop down the company branch/distributor/seller you want to check.
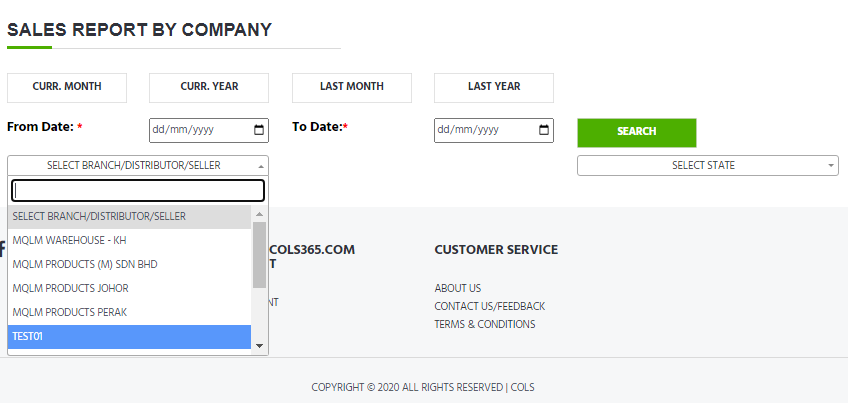
Step 4: Select on drop down which state you want to check.
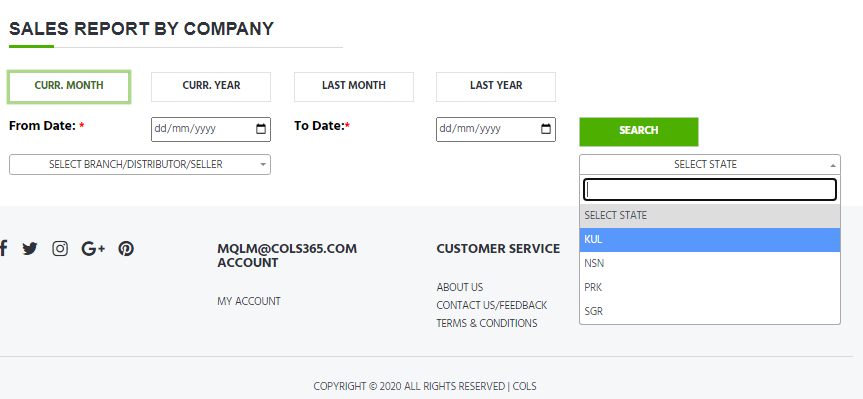
Step 5: Click search button.
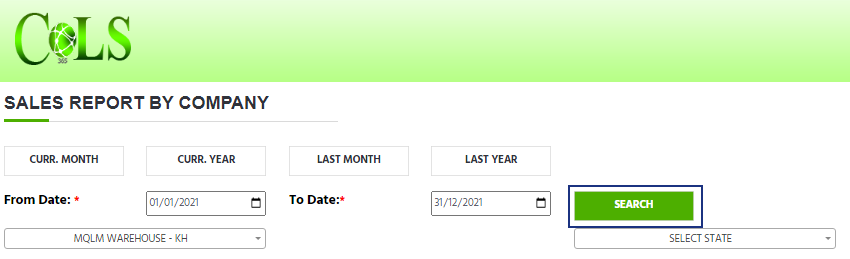
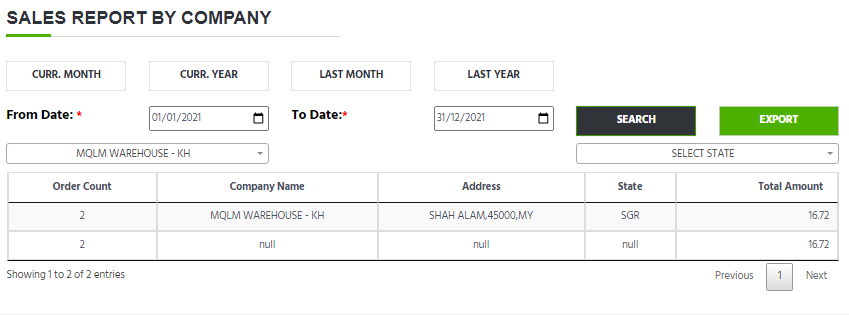
Note: If you want the excel report, just click export button.
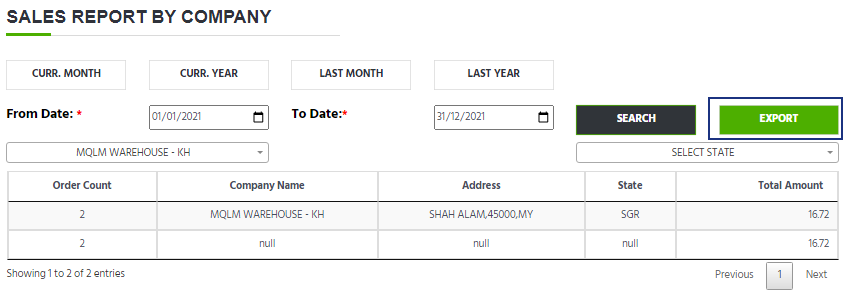
Sample Excel Report:

SALES REPORT BY CUSTOMER:
Step 1: On Report menu page, click the SALES REPORT BY CUSTOMER.
Step 2: Select on drop-down From what date and To what date you want to view or select the button of current year, current month, last month or last year.

Step 3: Select on drop down the company you want to check.
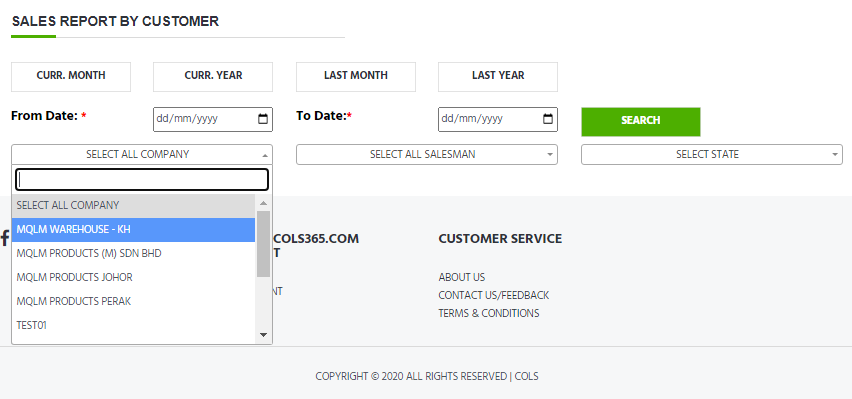
Step 4: Select on drop down the salesman you want to check.
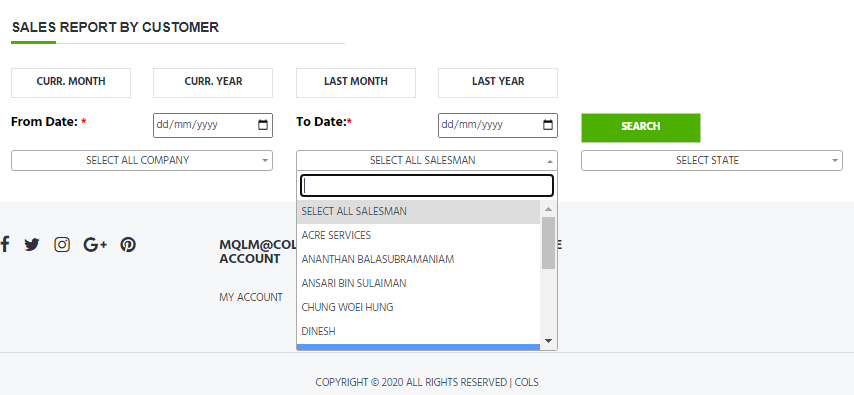
Step 5: Select on drop down which state you want to check.
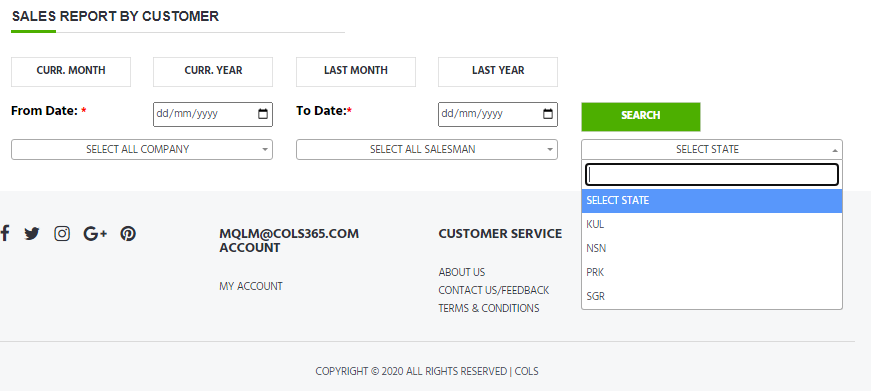
Step 6: Click search button.

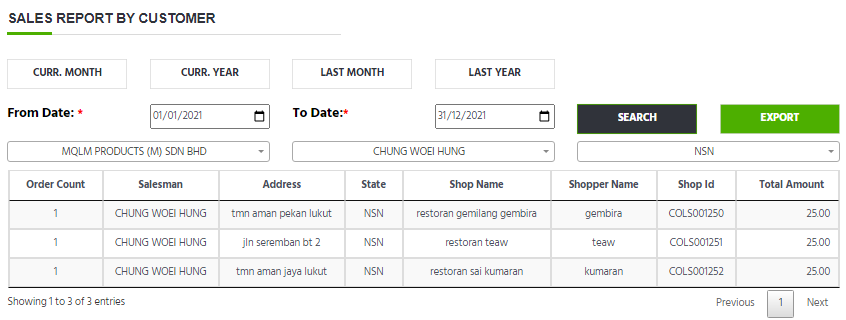
Note: If you want the excel report, just click export button.
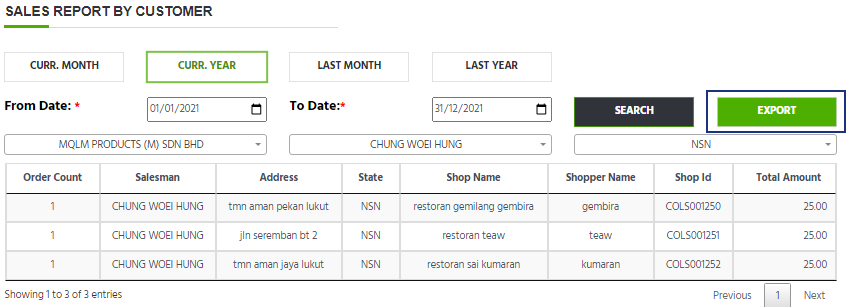
Sample Excel Report:

STOCK-IN REPORT:
MANUFACTURER/DISTRIBUTOR can view and monitor the history of StockIn by month, by specific date, and by year.
Step 1: On the Stock-In Report Page, select on drop-down From what date and To what date you want to view or select the button of current year, current month, last month or last year.

Step 2: Click Search Button.

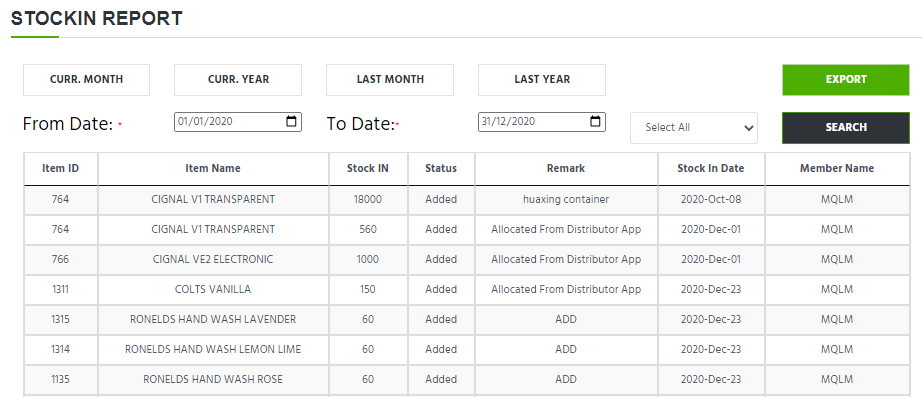
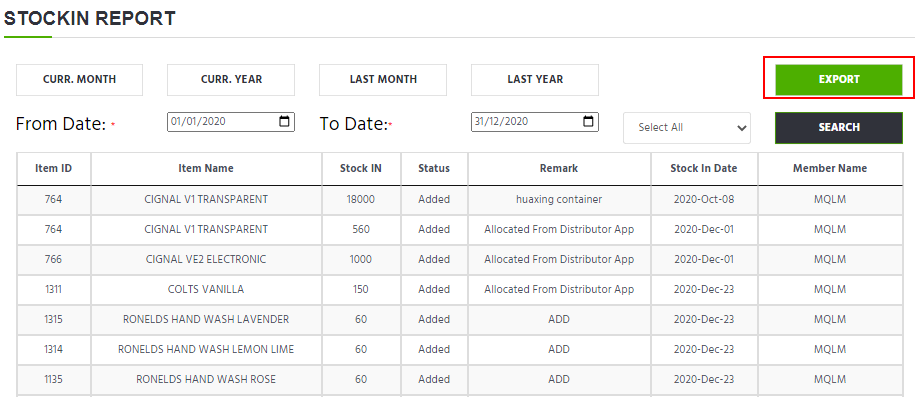
Note: If you want to export the data after search just click the export button.

FUNCTION OF POS [POINT OF SALES]:
Manufacturer/Distributor can sell item using POS.
Step 1: Click POS Sell button. Note: Either the two button is ok to use.

POS HOME PAGE:
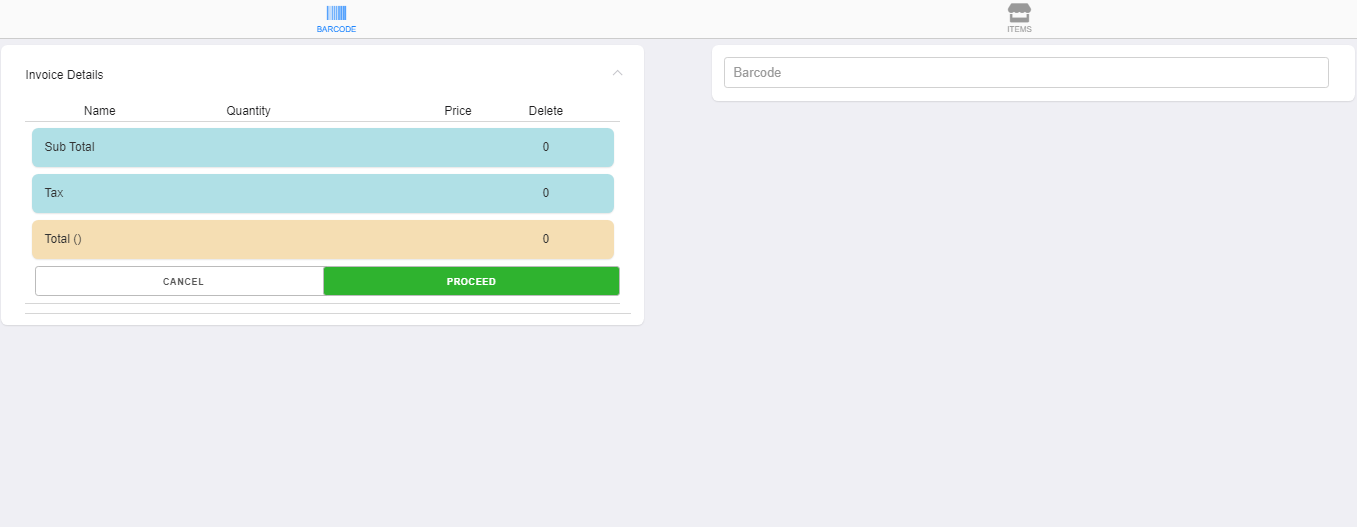
Step 2: Click items icon or scan the barcode of the item.
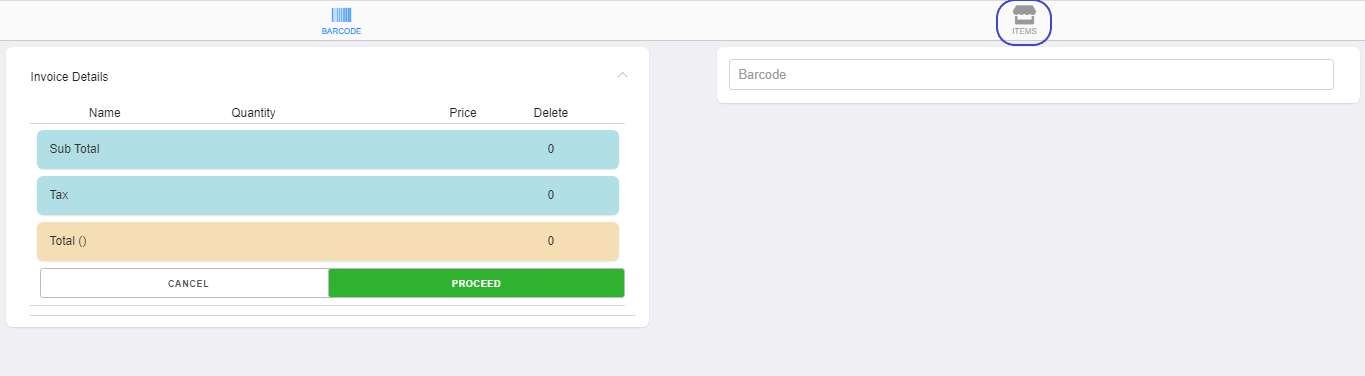
Step 3: Click the cart button on the items that customers want to buy. Note: Can choose the item by category.

Step 4: Check the order on the screen if correct and if not can edit the qty by clicking the box or if you want to delete just click delete button.

Step 5: Click the proceed button for payment.

Step 6: Verify the amount and customer as well if already added to your customer list. Get customer phone number and click search button.
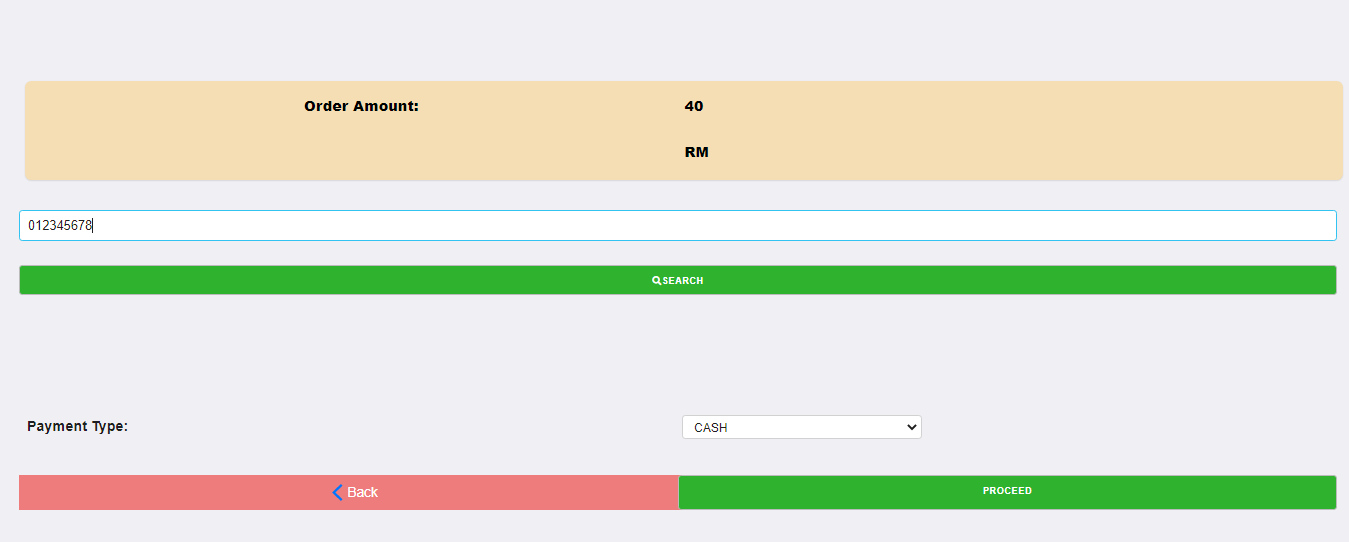
If don't have add customer. Type customer name.
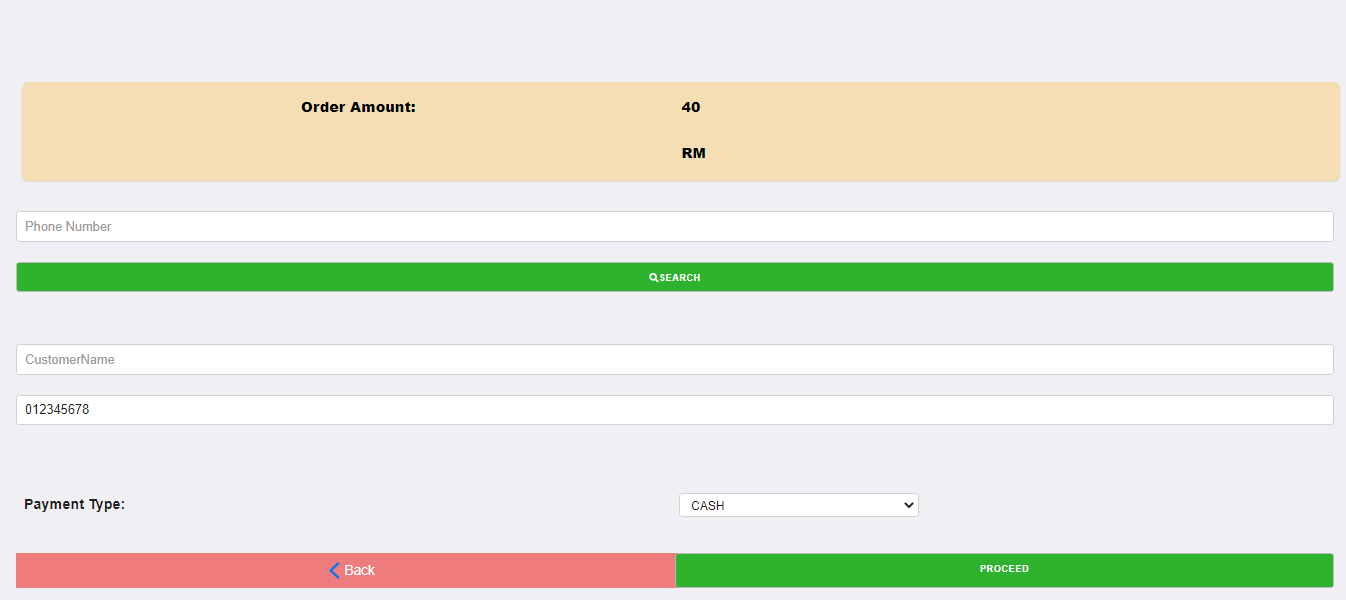
Step 7: Select payment type if cash or credit.

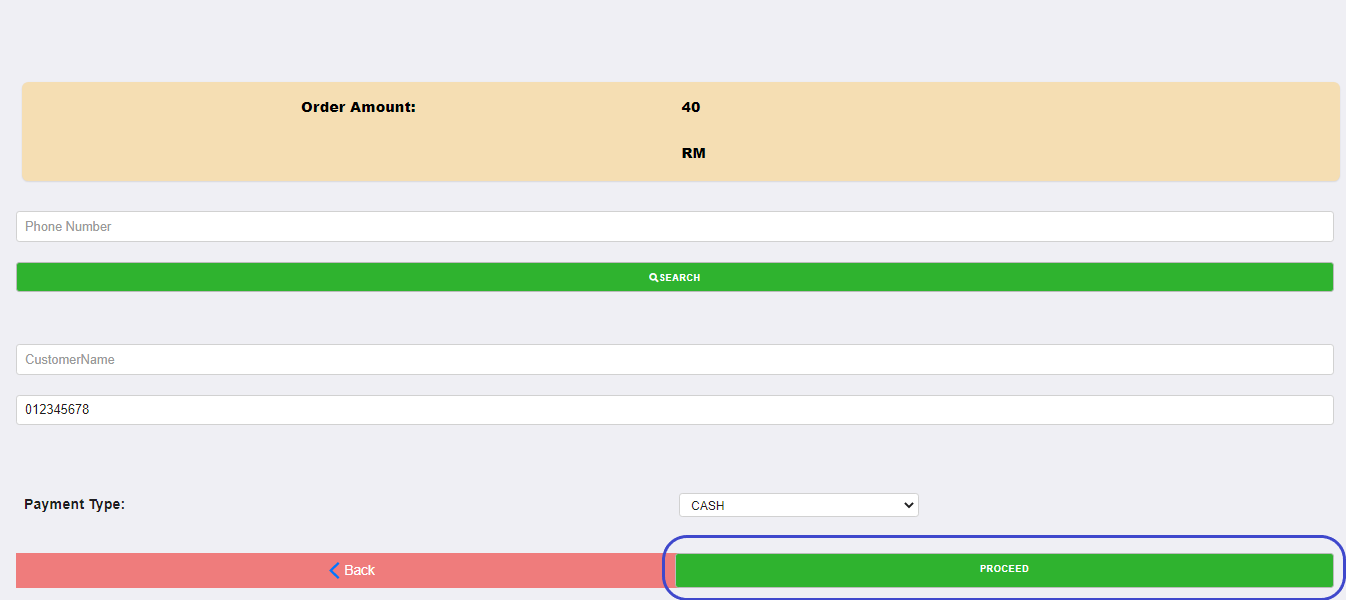
Step 8: Click proceed for payment button.
CASH PAYMENT RECEIPT
CREDIT PAYMENT RECEIPT
Note: If you want to print the bill receipt just click thermal printer button and if you want to go back POS page click sell button.
FUNCTION OF SHOP BUTTON:
Once you click SHOP BUTTON, it will go to landing page.
![]()

No Comments